

vSAN types supported
The shared storage systems most widely used and supported by almost all operating systems are iSCSI, NFS and SMB. Each runs its own protocol and connector type.
iSCSI
iSCSI works by transporting block-level data between an iSCSI
initiator on a server and an iSCSI target on a storage device. The
iSCSI protocol encapsulates SCSI commands and assembles the data
in packets for the TCP/IP layer.
NFS
Network File System (NFS) is a distributed file system protocol
that allows a user on a client computer to access files over a
computer network much like local storage is accessed. Used mainly
on UNIX/Linux systems.
SMB
SMB is a communication protocol for sharing files and printers.
It is the native file-sharing protocol in Microsoft Windows
networks.
Create a vSAN
- Go to Storage>Virtual SAN option in the left menu.
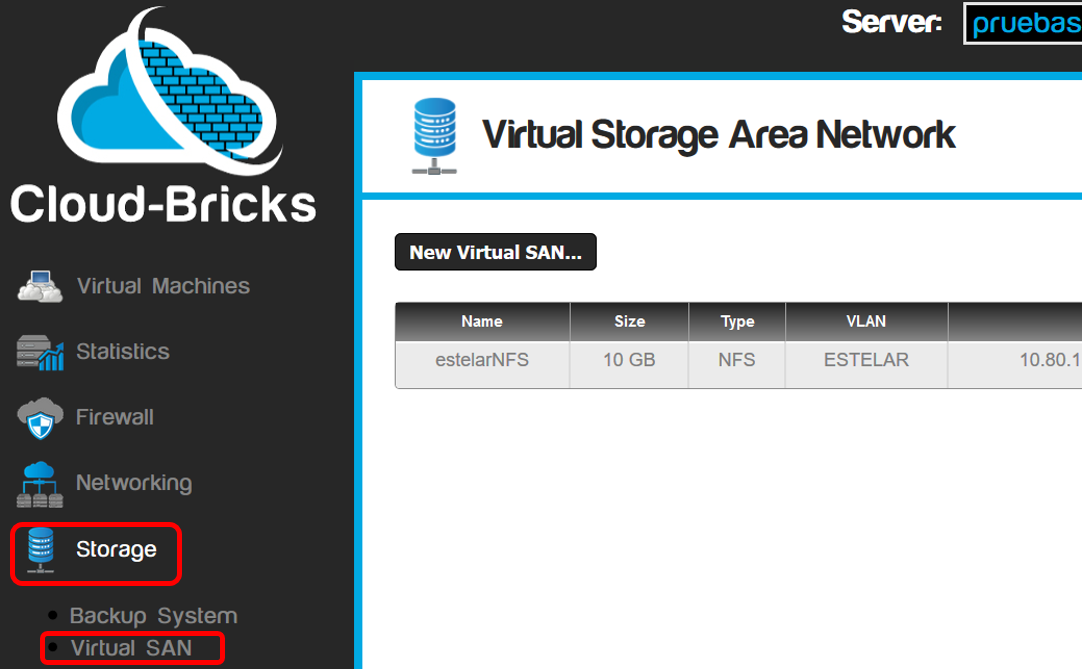
- Click the New Virtual SAN... button
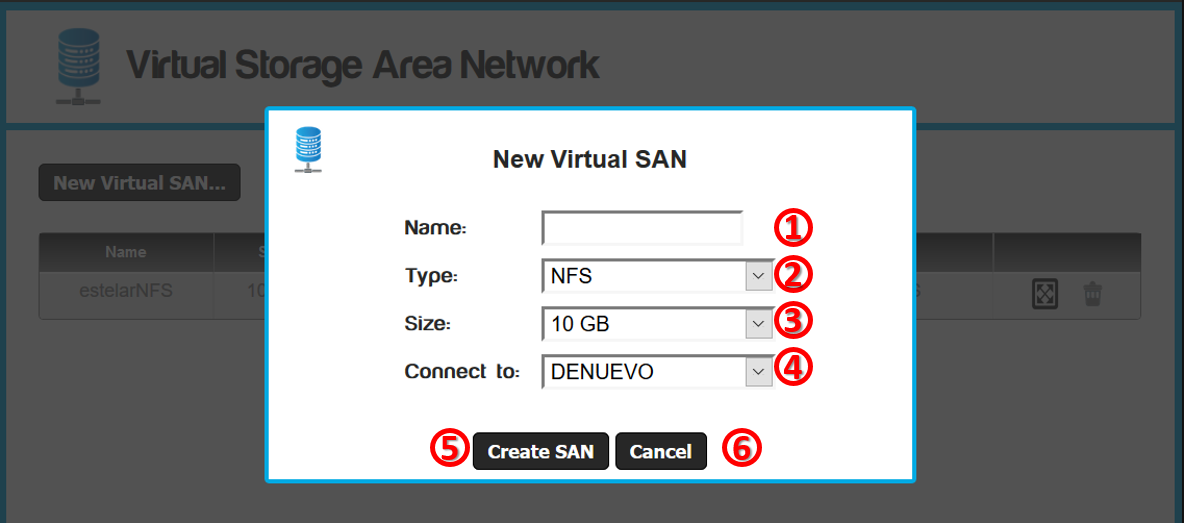
- Name of the vSAN.
- Type VSAN, choose between NFS, SMB and iSCSI.
- vSAN sizes in GB.
- We suggest starting with a small size.
- You can increase the size if necessary.
- Shrinking is not supported yet.
- vLAN network where the
vSAN will be available.
- Only virtual machines belonging to that VLAN will be able to
access the vSAN.
- Create SAN button: Will create the vSAN.
- Cancel button: Cancel any operation.
Increase size of vSAN
- When a shared file or vSAN is created, is possible to increase
the sizes, however, the decrease is not supported yet.
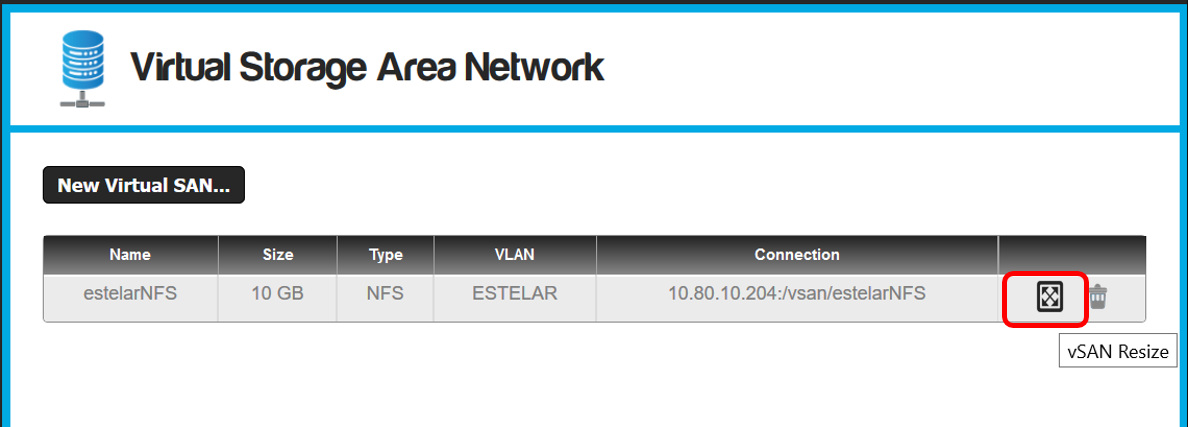
- To increase the sizes of a VSAN click on the icon to the right of "Alter size VSAN."
- Select the new size.
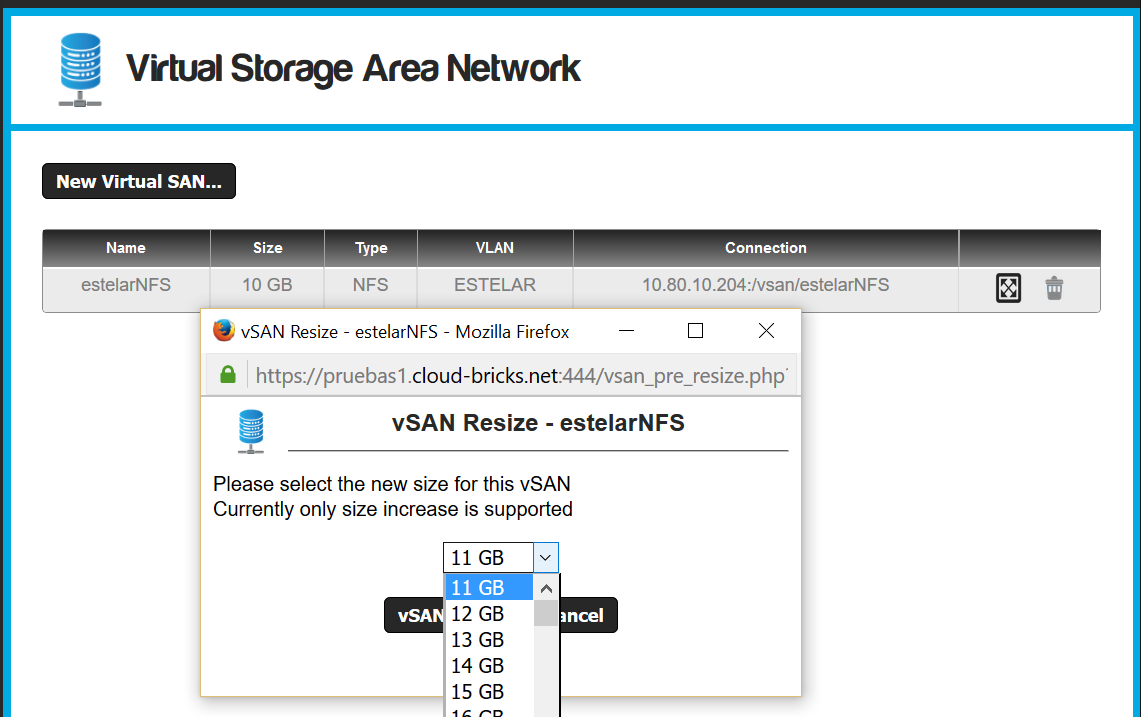
- If it is an iSCSI vSAN, it will be necessary to re-scan the target or reboot the "initiator" to get the new size.
- To avoid problems, we suggest disconnecting the vSAN client before performing this operation and reconnect it when finished.
- Review the documentation for your operating system to learn
how to do this safely.
Connection between client and vSAN
- Each communication protocol uses different connection tools or
client software, which are installed on virtual machines.
- To connect your virtual machine to a VSAN you need to know the
IP address and the name of the VSAN. This information can be
obtained from the "Connection" column of the Virtual SAN table.
- Here are examples of some operating systems.
Connections from Linux
iSCSI on Linux (Centos/RedHat/Oracle)
- On Red Hat systems is required to install the iscsi-initiator-utils
package
#yum install iscsi-initiator-utils
- Discover the available targets
#iscsiadm -m discovery -t sendtargets -p <targetIP>
- Restart iSCSI service:
#service iscsi restart
- Connect to the desired target, using the name provided
previously by the "iscsiadm -m discovery" command, replace
<vSANIP> with the IP address of your VSAN and
<vSanNAME> with its name.
#iscsiadm --mode node --targetname iqn.2003-01.org.vsan-<vSanNAME> --portal <vSANIP>:3260
-
Check if the iSCSI disk is recognized and note the name of the
device (/dev/sdX)
#fdisk -l
- Now you may wish to proceed to partition the disk (fdisk), formatting (mkfs) and mount (mount)
- If you want the iSCSI disk is mounted automatically at
startup, you must add a line to /etc/fstab file,
replacing <device> with the corresponding device to your
hard iSCSI
/dev/<device> /iscsi ext4 _netdev 0 0
NFS on Linux
- Install the NFS client software:
- Centos / RedHat / Oracle
- #yum install nfs-utils
- Ubuntu:
- #apt-get update
- #apt-get install nfs-common
- Suse / OpenSuse
- #zypper install nfs
- Now mount the shared storage, (replace "NFS" with the name of your VSAN and "<nfsIP>" with the IP Address of your VSAN)
#mount.nfs -o vers=3,nolock<nfsIP>:/vsan/NFS /<MountPoint>
- If you want it to be mounted at boot time, add a line to the /etc/fstab
#<nfsIP>:/vsan/NFS /<MountPoint> nfs _netdev 0 0
SMB on Linux (Centos/RedHat/Oracle)
- In Linux systems it is required to install the package samba-client to explore, open and copy the files. And the package cifs-utils to mount the remote filesystem.
	#yum install samba-client
	#yum install cifs-utils
- With smbclient you can transfer files similar to FTP
system. (do not forget to replace "SAMBA" with the name of your
VSAN)
	#smbclient //<smbIP>/SAMBA
	(If system asks for a password just press ENTER)
- To mount the filesystem:
#mount -t cifs //<smbIP>/SAMBA /mnt/<MountPoint> -o guest
- If you want it to be mounted at boot time, add a line to the /etc/fstab
//<smbIP>/SAMBA /mnt/<MountPoint> cifs guest,_netdev 0 0
Connections from Windows
iSCSI on Windows
- Windows systems use a wizard called "iSCSI Initiator"
which is responsible for mounting the disk at system startup.
- In Windows iSCSI volumes look like normal drives.
- Windows cannot use volumes that have been formatted in Linux
EXT format, we recommended to format directly into Windows.
- Go to Administrative Tools>iSCSI Initiator
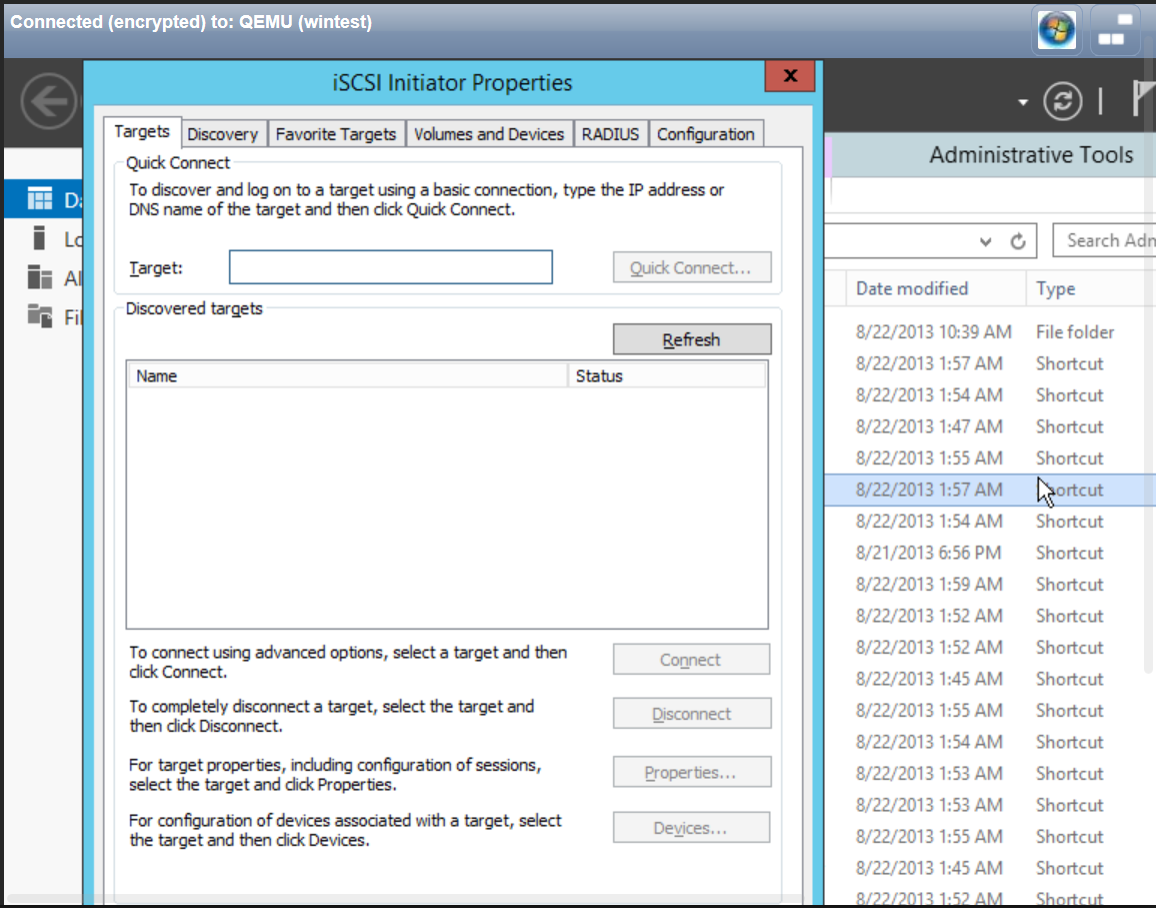
- Enter the IP of the vSAN and click Quick Connect.
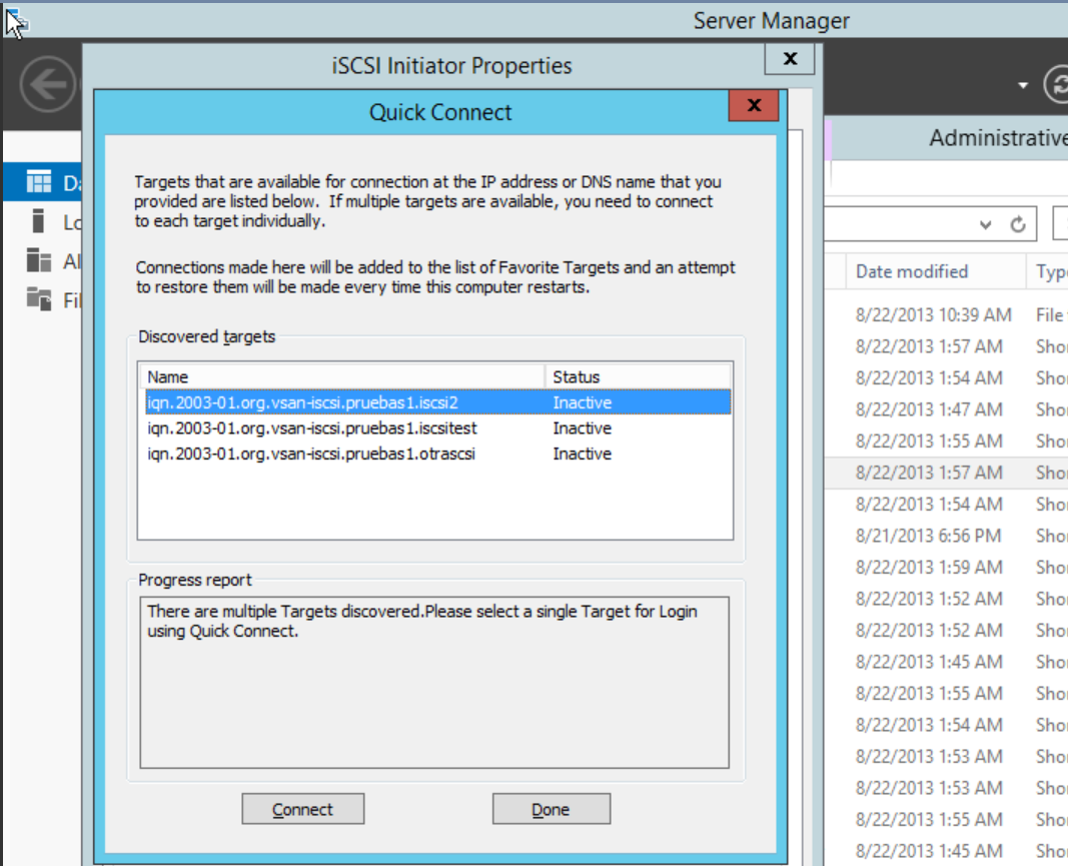
- vSANs available appears, select the correct vSAN and click "Connect", then click "Done" and choose the "Advanced" button.

- Select as network adapter the "Microsoft iSCSI initiator"
option
- Initiator IP: Choose the virtual machine private IP that corresponds to the VLAN where we connect the vSAN
- Target portal IP: Choose the vSAN IP.
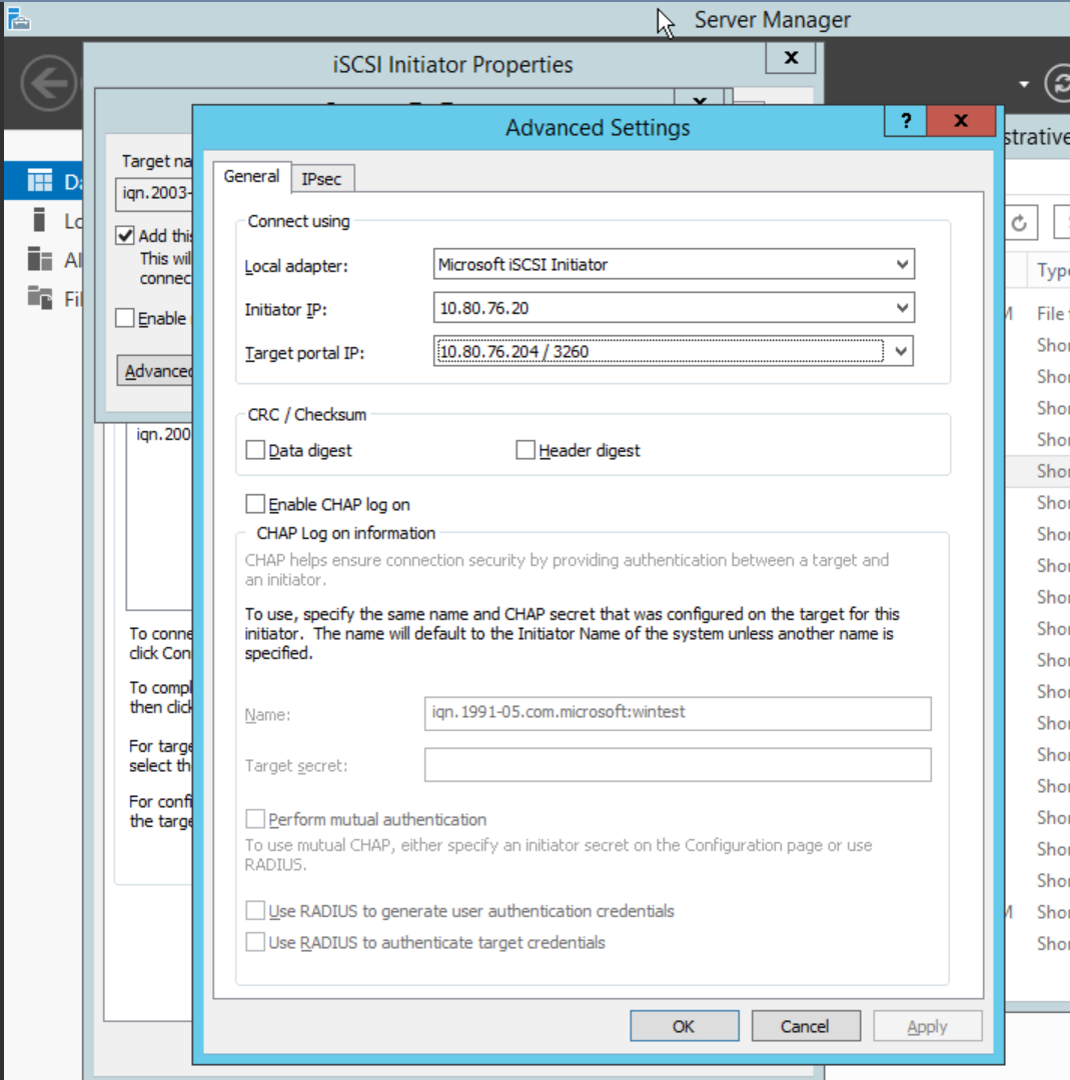
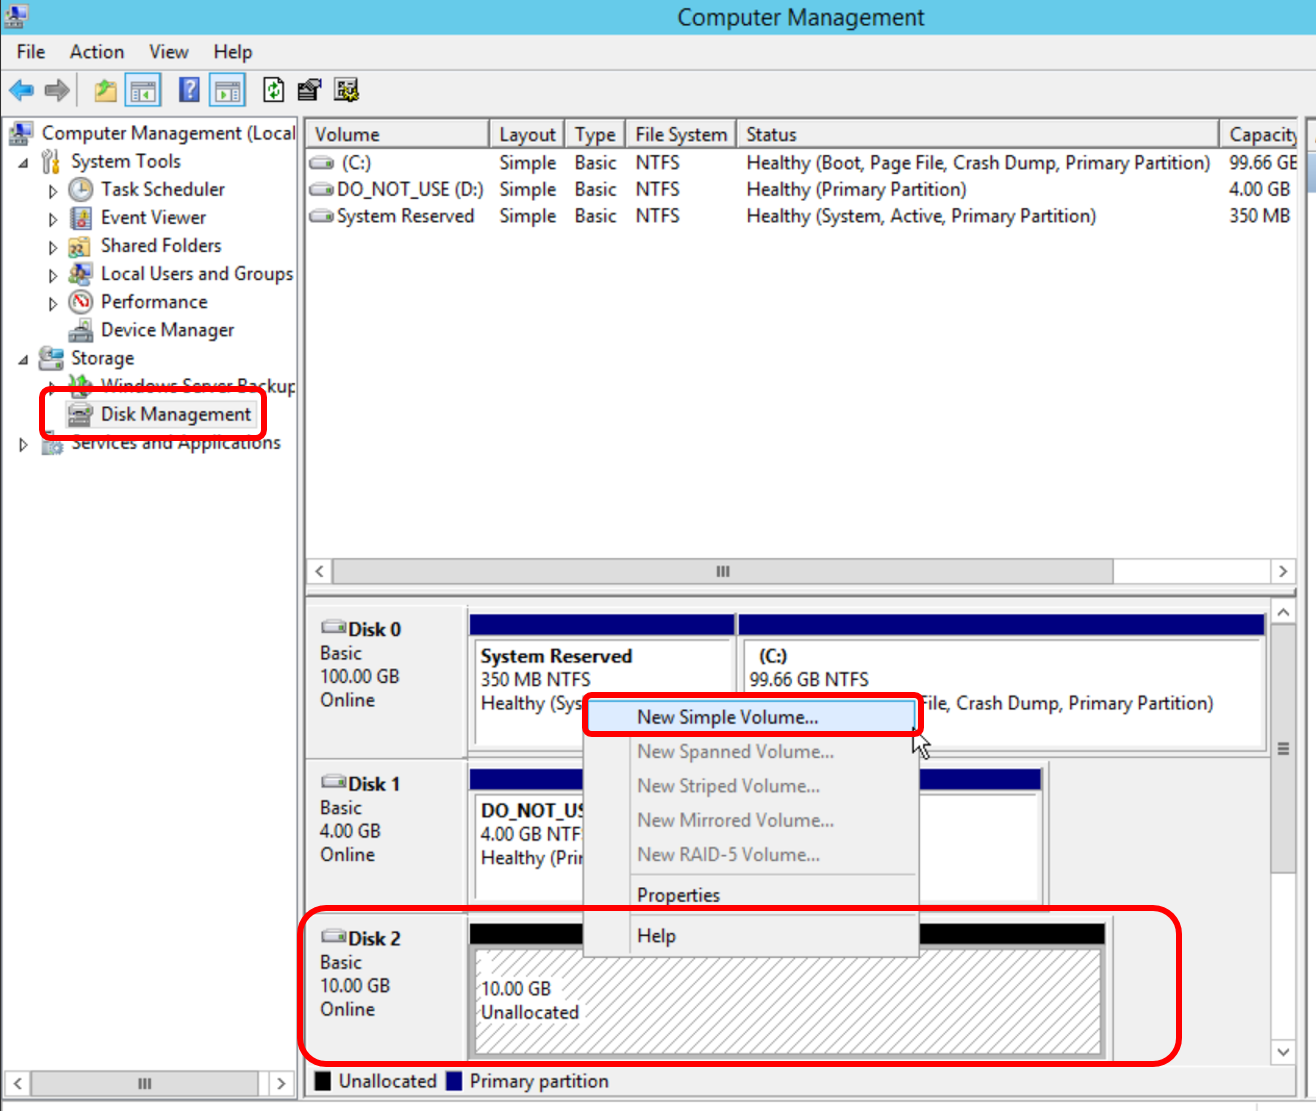
- Now you can use Disk Manager to format the vSAN and mount it.
- Administrative Tools -> Computer Management ->
Storage -> Disk Management
NFS on Windows
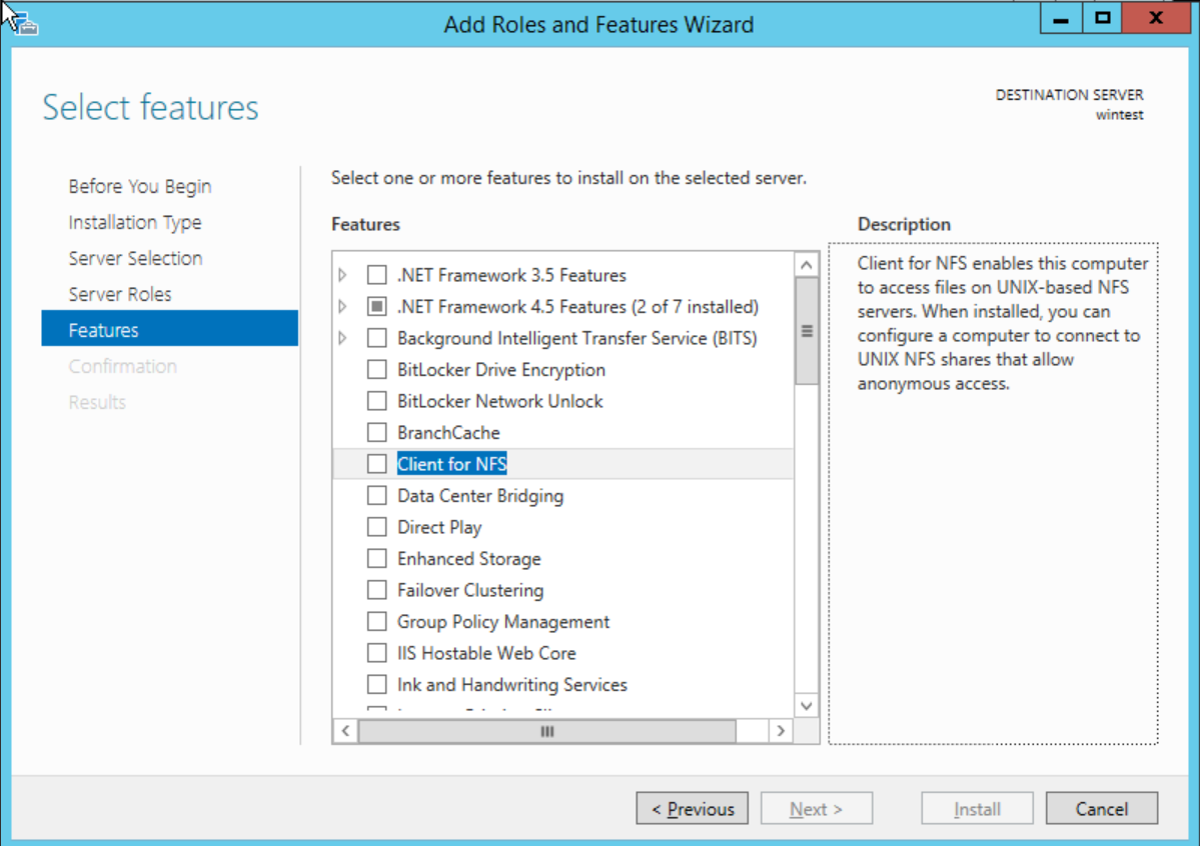
- You must install the NFS software for Windows.
- Go to Server Manager -> Add Roles and Features ->
Features -> Client for NFS.

- Select the "Role-based or feature-based installation" option, click on Next

- In the Features option, select Client for NFS, click on Next
- Open the Registry Editor (regedit.exe) and go to the
directory:
HKEY_LOCAL_MACHINE\SOFTWARE\Microsoft\ClientForNFS\CurrentVersion\Default.
- Create two DWORD records called Anonymous UID and Anonymous Gid both to 0.
- Open a command line window and type the following command:
nfsadmin client config fileaccess=777 - Restart your Windows Virtual Machine
- You can connect to the vSAN with the traditional syntax
Windows \\<IPnfs>\vsan\NFS
(do not forget to replace NFS with the name of your VSAN)
SMB en Windows
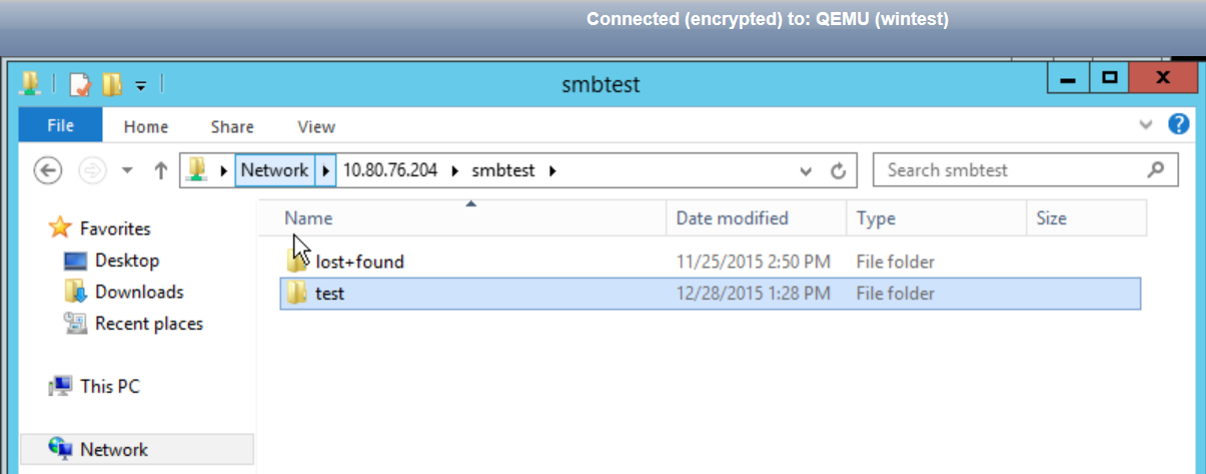
- To use a SMB shared resource, simply enter the IP in the file
explorer and the resource name.
Example:
\\<IPsmb>\SAMBA. - Do Not forget to replace SAMBA with the name of your VSAN.
Demo Video