
- This tool allows to create a permanent connection between a private customer network and one of the VLANs configured in Cloud-Bricks.
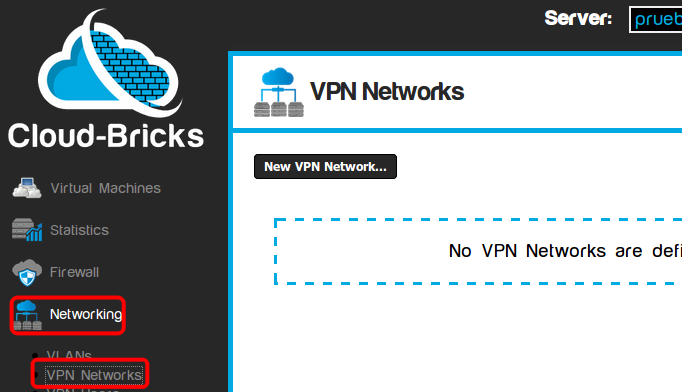
- These connections can be configured by navigating to "Networking>VPN Network" on the left menu.
VPN Characteristics
- It is used to inter-connect an external private network with a VLAN using an IPSEC tunnel.
- You will need a router with IPSEC support in the customer's network.
- Customer's client computers will be a able to access your Cloud Virtual Machines transparently.
- Access will be allowed only to a fixed public IP address.
- Authentication is done through a IPSEC "Shared Key".
- When an external network is connected to a VLAN using IPSEC, the public IP address of the remote network can not be used for any other VPN connection.
Network topology
A VPN network connection between the customer and the Cloud network is displayed:

Cloud Settings
To start the configuration you will need the following
information:
- Public IP address used by the customer router.
- IP address and mask of the private customer network.
- If the router is behind a NAT connection, we will also require
the private IP address of the router.
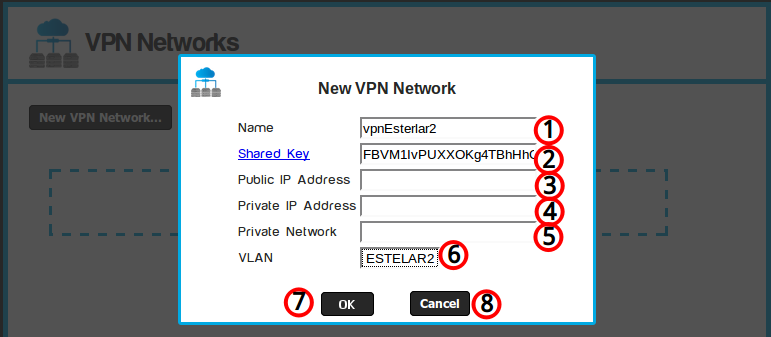
- Assign a name for the VPN connection.
- Shared Key: It must be a very complex a password to
secure the connection.
- Public IP Address: It is the IP address used by the router to connect to the Internet.
- Private IP Address: If your router is behind a NAT
connection, you must specify the private IP address of the
router,
If this is not the case, you may leave this field empty. - Private network: IP and mask for the private customer network. (Example: 192.168.1.0/24 or 172.30.11.0/255.255.255.0).
- VLAN that will be
connected to the customer network.
- OK button, accepts current modifications.
- Cancel button, cancel all operations.
The system itself may reject your private network if:
- Another VPN connection uses a similar or overlapping private network that can generate routing conflicts.
- Your private network conflicts with any of the VLANs
configured on the Cloud server.
For example, this may happens if the customer private network is of the form 10.80.X/0/24
- Ony IPv4 private networks are allowed (IPv6 is not yet supported for this type of connection).
- IP addresses for private networks must belong to the 10.x.x.x / 16 or / 24, 192.168.X.X / 16 or 172.16.0.0/12 networks.
- Private IP addresses on the 196.254.X.X/16 network segment
should not be used.
Once you click the "Commit changes" button, the system
will be ready for IPSEC connections, it is now necessary to
configure the router on the client side.
- Virtual servers on corresponding Cloud VLAN, must be turned off and then turned on again (not reset) so that the system can perform the appropriate routing configuration.
Configuring a Linux Router (CentOS/RedHat/Fedora)
A machine with a Linux system can be configured as an IPSEC
router.
These instructions are made based on RedHat distributions
(CentOS, Fedora, etc), but your can use them as a guide for other
distributions.
Install the openswan package:
#yum install openswan
Edit the file /etc/ipsec.secrets leaving only a line with
the following information:
<ROUTER_IP> <CLOUD_IP>: PSK “<SHARED_KEY>”ROUTER_IP: It is the IP of your router, if you are behind a NAT connection you must specify the private IP address of the router, otherwise use the public IP.
CLOUD_IP: IP address of your physical cloud server.
SHARED KEY: Password that was set up within the cloud system "VPN Networks" page.
Example:
192.168.0.250
74.50.112.156: PSK "rKtllZXP....."
Edit the file /etc/ipsec.conf: (spaces at the beginning of each line are very important!)
version 2 # conforms to second version of ipsec.conf specification
config setup
    dumpdir=/var/run/pluto/
    nat_traversal=yes
    virtual_private=%v4:0.0.0.0/0
    protostack=netkey
    force_keepalive=yes
    keep_alive=60
conn MY_VPN
    authby=secret
    pfs=yes
    auto=start
    keyingtries=3
    ikelifetime=8h
    keylife=1h
    type=tunnel

    #Public IP address of your router
    #(if you are behind a NAT, using private IP)
    left=192.168.0.250

    #The customer private network, format IP/mask
    leftsubnet=192.168.0.0/24

    ## Router private IP address:
    leftsourceip=192.168.0.250
    #Public IP address of the physical cloud server
    right=74.50.112.156

    #IP/mask of the destination VLAN cloud system
    rightsubnet=10.80.45.0/24

    dpddelay=10
    dpdtimeout=20
    dpdaction=clear
Run the following command, and place it in a system startup script so it can be executed each time the system is rebooted:
#Avoid ICMP redirects
for vpn in /proc/sys/net/ipv4/conf/*; do
echo 0 > $vpn/accept_redirects; echo 0 > $vpn/send_redirects;
done
The Linux router must be configured as the default gateway on the customer network:
- If the router uses the IPTABLES NAT to share the IP address
with other computers on the network, it is very important to
configure the iptables NAT to avoid modifiying packets with
destination to the Cloud VLAN:
Example 1: If your rule uses the SNAT command like this:
iptables -t NAT -A POSTROUTING -s <private_network/mask> -j SNAT –to <PUBLIC_IP>
Then the rule must be
modified in order to ignore the VLAN Cloud network, this way:
iptables -t NAT -A POSTROUTING -s <private_network/mask> ! -d <vlan_network/24> -j SNAT –to <PUBLIC_IP>
Example 2: If your rule uses the MASQUERADE command like this:
iptables -t NAT -A POSTROUTING -o <interface> -j MASQUERADE
Then the rule must be modified in order to ignore the VLAN Cloud network, this way:
iptables -t NAT -A POSTROUTING -o <interface> ! -d <vlan_network/24> -j MASQUERADERestart the IPSEC service to start the connection:
#service ipsec startCheck the log file /var/log/secure to see if the connection process was successful, look for the message "IPsec tunnel mode SA established".
If the connection was successful, Openswan should create the necessary routes to access the cloud VLAN, you can check the routing table of Linux with the command:
#netstat -nr
You should now be able to ping your Virtual Machines from the
customer network. Ping and any kind of IP communication should work
in both directions. (Remember to always use the private IP addresses
of both networks).Configuring a Mikrotik router
A Mikrotik router or a computer with the RouterOS
operating system, can be used as an IPSEC router to connect to the
Cloud-Bricks VPN service.
In this example we will use the "WinBox" software to
configure the Mikrotik system:
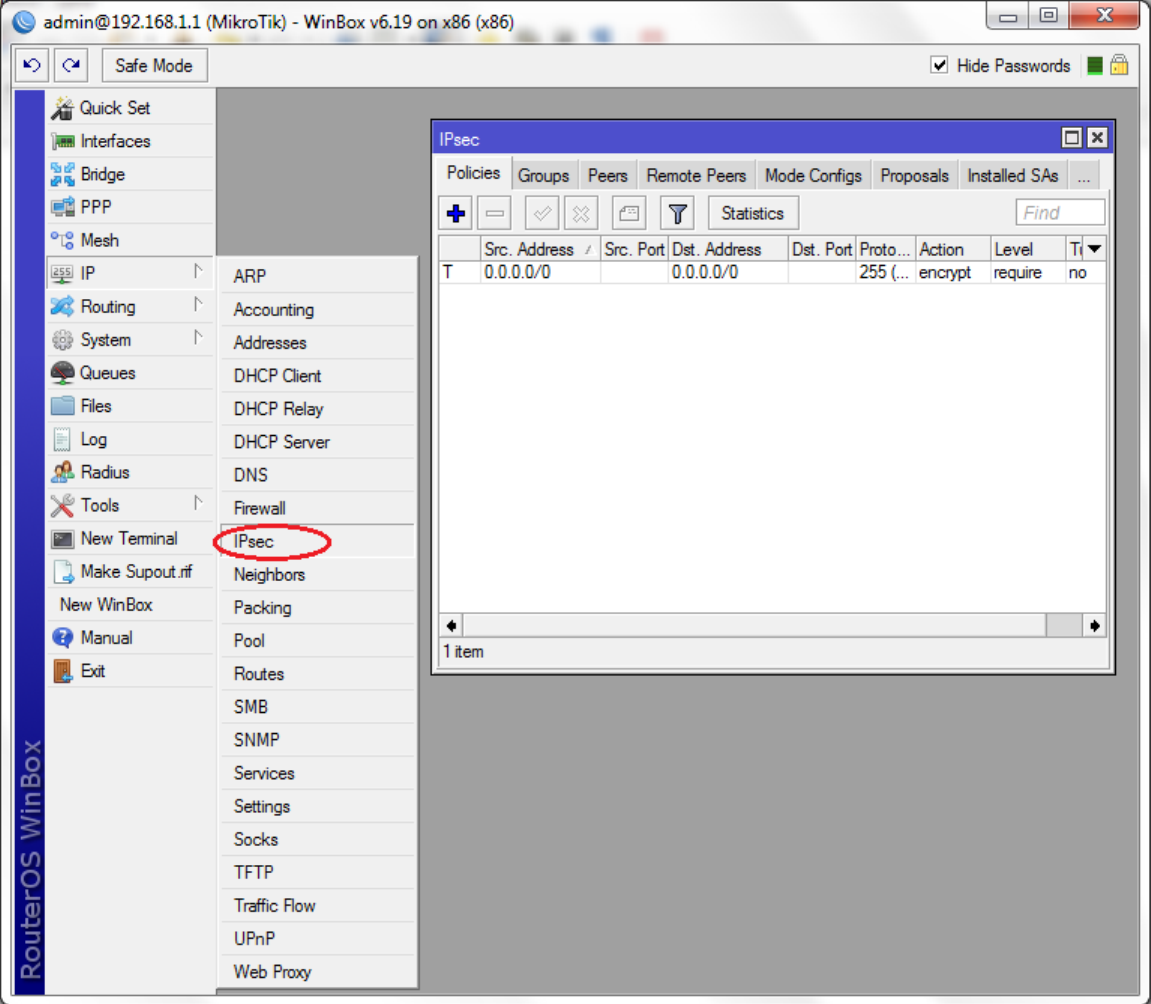
From the menu select "IP → IPSEC".
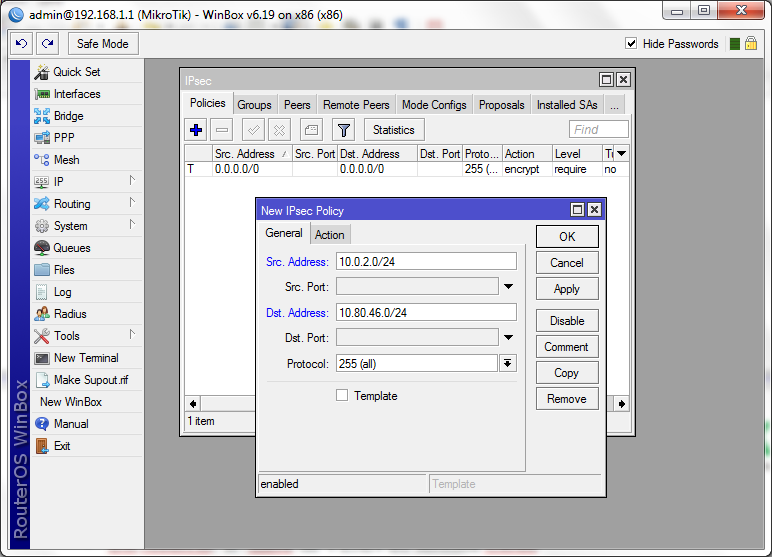
In the IPSEC window, click on the "+" icon. The "New IPSEC Policy" window appears.
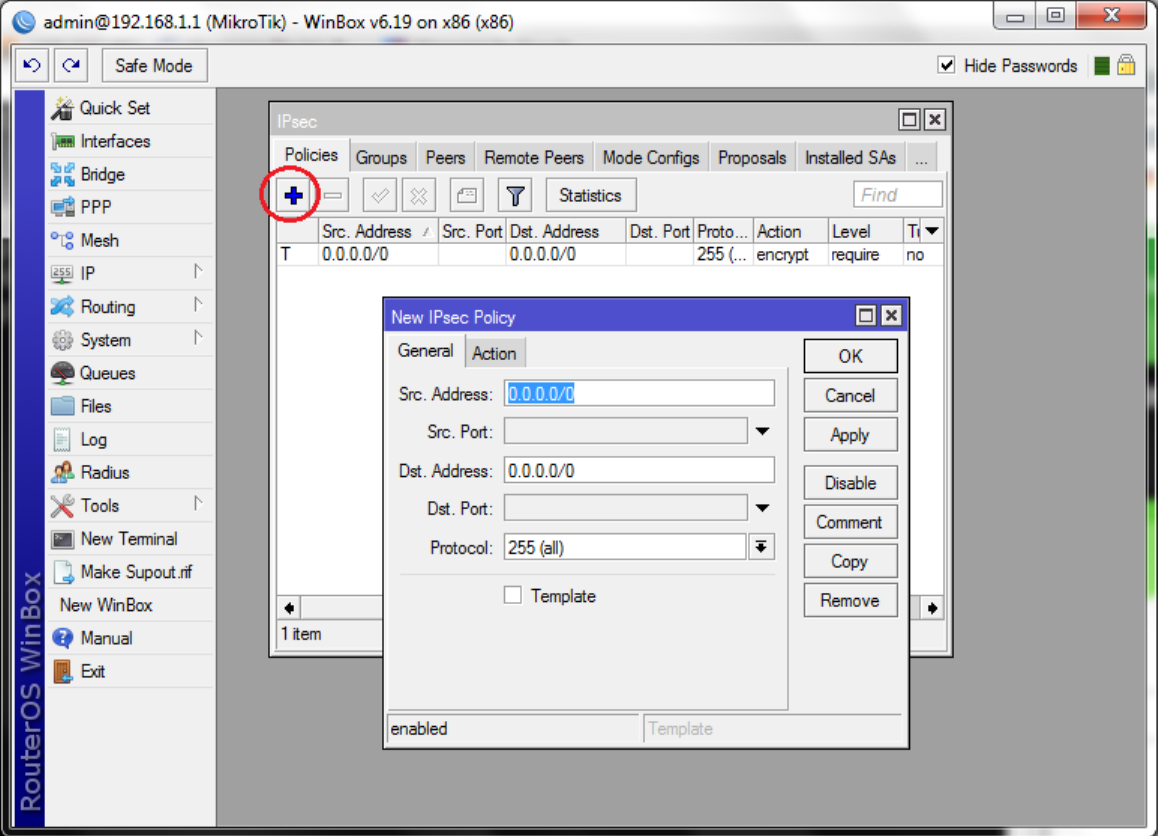
Enter the following information:
- Src Address: IP/mask of the customer's private network.
- Dst Address: IP/mask of the cloud VLAN.
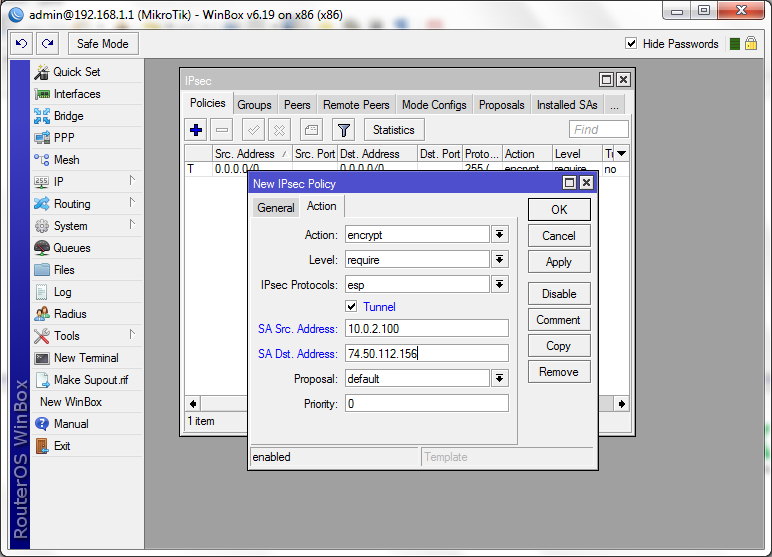
Click on the "Action" tab in the same window ("New IPSec Policy").
Configure it as follows:
- Enable the “Tunnel" checkbox.
- SA Src Address: Router IP address (use the private IP if the router is behind NAT)
- SA Dst Address: IP address of your physical Cloud
server.
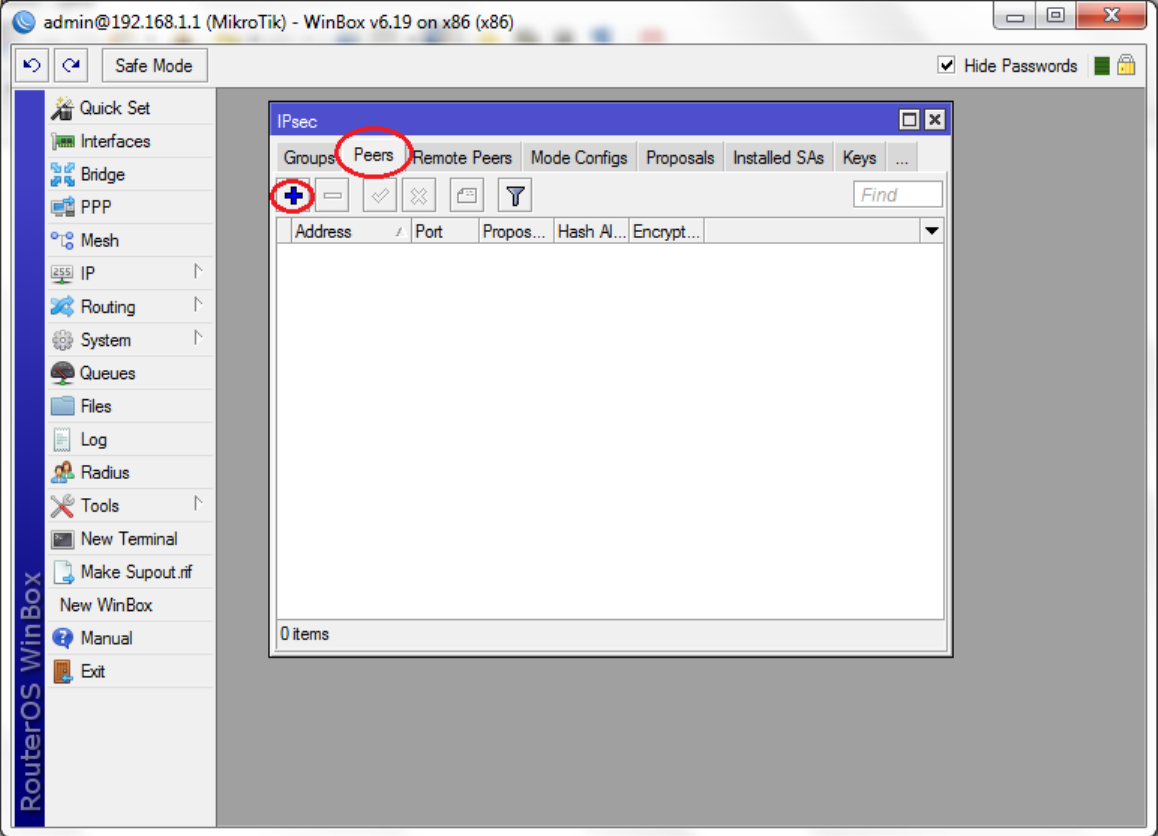
Click "OK". Then select the "Peers" tab and click the "+" icon.
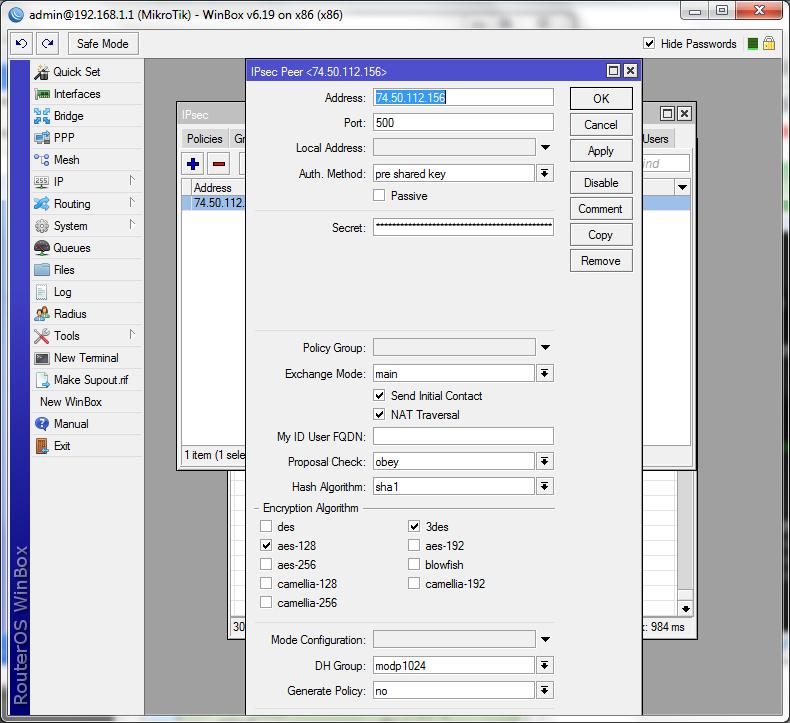
In the "New IPSEC Peer" window, enter the following data:
- Address: Public IP address of your Cloud server.
- Auth Method: Select "pre shared key".
- Secret: Shared Key (password) generated in the Cloud system when the VPN was configured.
- Exchange mode: Use "main".
- Enable the “Send Initial Contact” checkbox.
- If your router is behind NAT, activate the "NAT Traversal"
checkbox.
Click OK.
- If the router uses NAT to share its public IP address with other computers on the network, it is very important to configure the NAT rule to avoid altering packets going/comming from/to the Cloud VLAN, ie, the destination VLAN must be ignored by the NAT and MASQUERADE rules.
The configuration is ready, we need to generate some
traffic between both networks so the router activates the
connection to the Cloud service. Ping is enough for generating
such traffic:
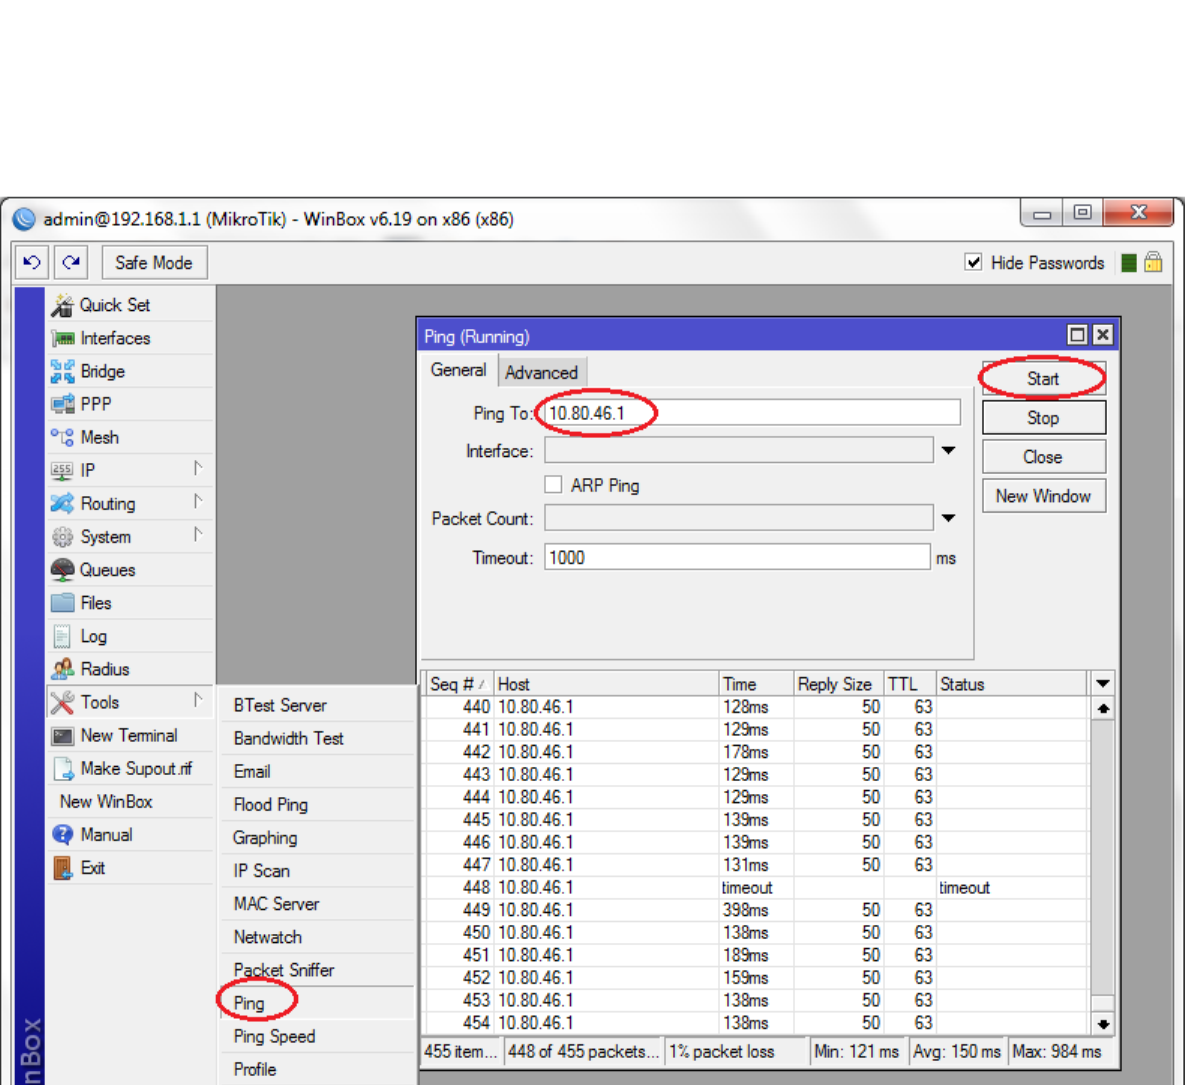
It should also be possible to ping computers to on the customerś private network from your Cloud Virtual Machines.
Juniper firewall conection (ScreenOS)
In this example we will show how to use a Juniper VPN enabled
device to connect to the Cloud-Bricks VPN service.
We recommend to use the Policy-Based Site-toSite VPN AutoKey IKE,
configuration.
We assume that the security device already has the trust
(private), and untrust (public) zones already configured with
routing and NAT properly working.
Configure entries in the Address Book
Here we must configure the private network on the customer side, we
will use 192.168.0.0/24 as examplePolicy > Policy Elements > Addresses > List > New
Address Name: Trust_LAN
IP Address/Domain Name:
IP/Netmask: (select), 192.168.0.0/24
Zone: Trust
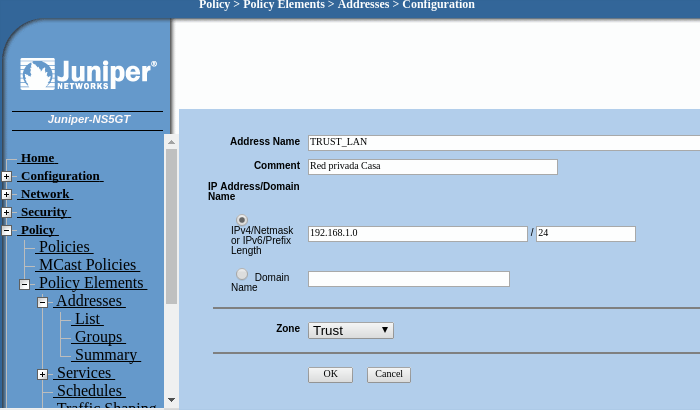
we need another entry in the address book to reference the remote VLAN in the Cloud:
Policy > Policy Elements > Addresses > List > New
Address Name: CLOUD-BRICKS-VLAN
IP Address/Domain Name:
IP/Netmask: (select), 10.80.X.0/24 replace X with your VLAN number)
Zone: Untrust

VPN configuration
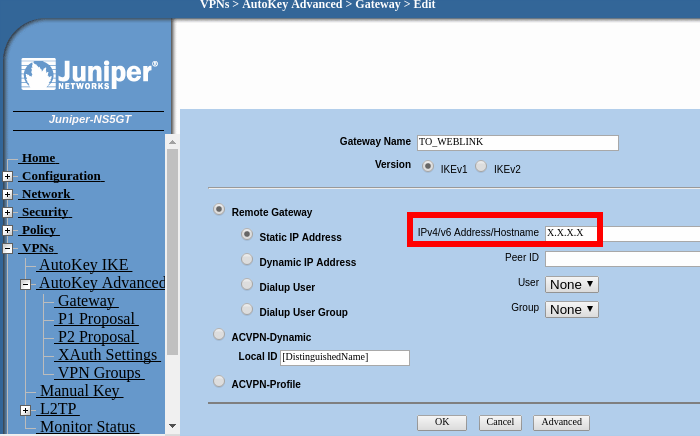
We are going to use the Cloud IP address as the VPN destination, (IP
Address of your Cloud Physical server), in this example we will name
the gateway as "TO_WEBLINK"
VPNs > AutoKey Advanced > Gateway > New
Click on "Advanced". On the "Preshared Key" field write the password configured in the Cloud-Bricks management interface (Shared Key) when you configured your VPN network. MAKE SURE YOU SELECT "UNTRUST" AS THE OUTGOING INTERFACE.
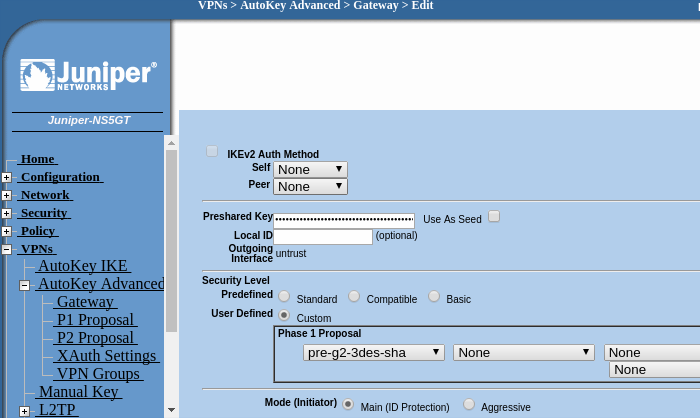
Click on "Return" and then "OK".
Navigate to VPNs > AutoKey IKE > New
We must use the remote Gateway created on the last step. In this example we will name the VPN as "WEBLINK_TUNNEL".
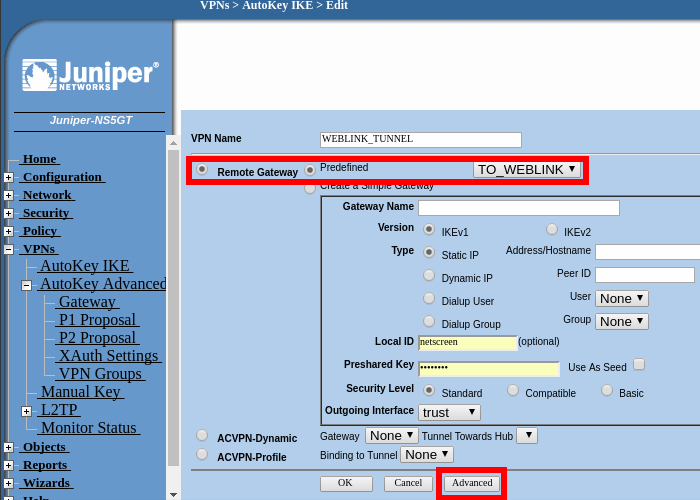
Click on "Advanced" in order to configure the following settings:
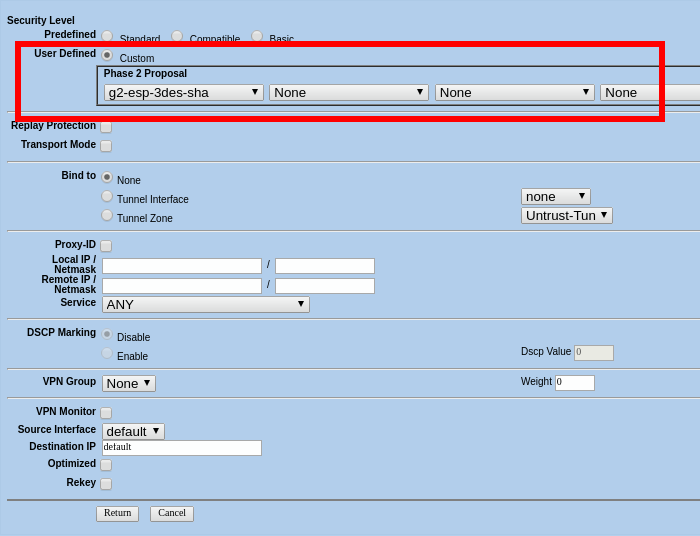
Click on "return" and then "OK"
Policy creation
To finish we must link together all the elements created using a
Policy, please navigate to:Policies > (From: Trust, To: Untrust) New
We will name our policy "WEBLINK_VPN"
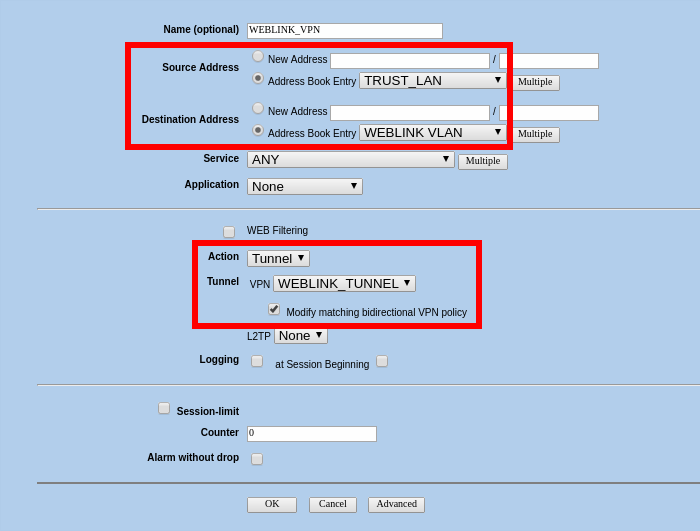
Make Sure your new VPN Policies are the first in the list, if not move them so they are placed on the first location.
Right after you click on "OK" the configuration is ready, however the device will only start the connection when there is traffic between the LAN and the remote VLAN.
To generate such traffic, we suggest to ping any of the VLAN IP addresses of the corresponding virtual machines from your LAN, (use the 10.80.X.Y IP addresses where X corresponds to your VLAN number)