
Esta ferramenta permite que uma máquina virtual sem um endereço
IP público funcione como um servidor de e-mail público na
Internet, tanto para enviar e receber mensagens.
Para fazê-lo, a VM deve ter um IP privado ou um endereço IPv4
NAT, (veja tipos
de endereços IP) e deve ser configurado com um software de
gerenciamento de e-mail adequado, (SendMail, PostFix, Exchange,
etc).
Seu sistema de e-mail deve ser configurado para funcionar sem
criptografia, A rede da Cloud-Bricks irá lidar com
criptografia externa para você, usando protocolos seguros como
POP3s, IMAPs, SMPTs e SMTP-STARTTLS. (Veja também Certificados SSL)
Criando um Servidor de E-mail
Depois de ter uma máquina virtual configurada e executada como um
servidor de e-mail, você pode prosseguir com a configuração da
nuvem:
Vá em Serviços do Cloud > Servidores E-mail no menu a
esquerda.

Clique em Novo servidor de email...

- Máquina virtual configurada como um servidor de e-mail.
- Redes que podem enviar e-mails para sua VM usando SMTP ou
SMTPs
- Isso é útil se você quiser restringir o acesso.
- TAs redes que aparecem nesta lista podem ser gerenciadas na seção Firewall Máquinas e redes.
- Protocolos para leitura de e-mail.
- Cloud-Bricks gerencia a criptografia para
protocolos seguros (IMAPs e POP3s).
Você deve comprar um certificado SSL para sua máquina virtual.
Veja mais em Como configurar certificados digitais - Se você deseja fornecer POP3 (porta 110) ou POP3s (porta 995), sua VM deve suportar o protocolo POP3.
- Se você deseja fornecer IMAP (porta 143) ou IMAP3s (porta 993), sua VM deve suportar o protocolo IMAP.
- Sua VM deve permitir a autenticação de senha simples.
(A Cloud-Bricks irá criptografar as senhas para acesso remoto usando SMPTs ou STARTSSL)
- Cloud-Bricks gerencia a criptografia para
protocolos seguros (IMAPs e POP3s).
- Domínios de email que serão gerenciados por esta VM.
- Por padrão, o sistema oferece um nome de domínio padrão útil para testes.
- O domínio padrão corresponde ao seu nome vm no formato: <virtual_machine>. <Customer_name> .vnat.net
- Esse domínio padrão já possui os registros MX necessários
para um sistema de e-mail totalmente funcional.
- Botão para adicionar mais domínios, é possível que uma única máquina virtual sirva vários domínios de e-mail.
- Botão OK: Atualiza a lista de servidores de e-mail.
(Commit necessário para concluir a configuração)
- Botão Cancelar: Descarta todas as alterações.
Depois de adicionar o servidor de e-mail, clique no botão Aplicar
Alterações para gerar a configuração de rede necessária.
Configuração DNS
Para que seu sistema de e-mail funcione perfeitamente, você
precisará criar alguns registros em seu servidor DNS:
MX Record
O registro MX é usado para informar qual é o servidor de e-mail
recebido para o seu domínio. Sua máquina virtual possui um nome de
domínio totalmente qualificado com o seguinte formato: <virtual_machine>.<customer_name>.vnat.net
Por exemplo, se o seu sistema Cloud-Bricks for
chamado"minhaempresa1,cloud-bricks.net" , e o nome de sua VM for
"emailserver", então você deve configurar o seguinte registro MX:
@ IN MX 10 emailserver.minhaempresa.vnat.net.
SPF or TXT Record
O registro SPF informa quais são os servidores autorizados para enviar e-mails em nome do seu domínio. É muito importante configurar esses registros para evitar que seu email seja identificado como SPAM.
Para criar o registro SPF, você precisará obter o endereço IP do seu sistema Cloud-Bricks, para o fazer, você pode usar o programa nslookup. Por exemplo, se o nome do seu sistema for "mycompany1.cloud-bricks.net":
# nslookup mycompany1.cloud-bricks.netThen you must configure the following records in your email Domain's DNS server:
Server: 8.8.8.8
Address: 8.8.8.8#53
Non-authoritative answer:
Name: mycompany1.cloud-bricks.net Address: 74.50.112.123
@                       IN      TXT     "v=spf1 a mx ip4:74.50.112.123 ~all"
@                       IN      SPF     "v=spf1 a mx ip4:74.50.112.123 ~all"
O registro TXT é usado para compatibilidade reversa com sistemas que não suportam o registro SPF.
PTR Record
O registro PTR ou DNS inverso é usado para verificar se um sistema de e-mail é realmente quem afirma ser. A idéia é verificar se o endereço IP do sistema corresponde ao seu nome e vice-versa.
Os registros PTR devem ser solicitados através do nosso serviço de suporte, pois apenas o Cloud-Bricks pode criá-los.
Para verificar se o seu sistema da nuvem configurou corretamente os registros PTR, você deve obter o nome do seu sistema ao executar uma solicitação PTR usando o endereço IP do seu sistema:
# nslookup
> set querytype=PTR
> 74.50.112.123
Non-authoritative answer:
123.112.50.74.in-addr.arpa name = mycompany1.cloud-bricks.net.
Se esta consulta retornar uma mensagem de erro, entre em contato com nosso serviço de suporte.
SMTP Security
O uso do sistema Cloud-Bricks para lidar com seus servidores de e-mail tem os seguintes benefícios de segurança:
- Eficiência: a criptografia é realizada no nível de hardware, liberando recursos da máquina virtual.
- Simplicidade: Você não precisa lidar com toda a complexidade da configuração de certificados SSL e gerenciamento de criptografia de senha, você só precisa configurar autenticação de senha simples em sua VM de e-mail e acesso SMTP e POP / IMAP simples. A Cloud-Bricks irá criptografar todo o tráfego para você.
- Lixo Eletrônico: O sistema rejeitará qualquer e-mail proveniente de servidores listados em black-lists no SPAMHAUS.
- Proteção contra ameaças: Todo o tráfego de e-mail passará por nosso Sistema de Prevenção a Intrusão.
Como configurar um servidor de e-mail
Estas são instruções básicas sobre como instalar software de gerenciamento de e-mail em máquinas virtuais Linux e Windows.Para obter informações mais detalhadas, consulte a documentação do seu sistema operacional.
Servidor de E-mail no Linux
Em Linux, geralmente os pacotes Postfix e Dovecot são usados para lidar com serviços de e-mail. Portanto, você já deve ter uma máquina virtual com sistema operacional base instalado, para este exemplo o Ubuntu será usado.
Instale o pacote Postfix com o comando abaixo:
#apt-get update
#apt-get install postfix
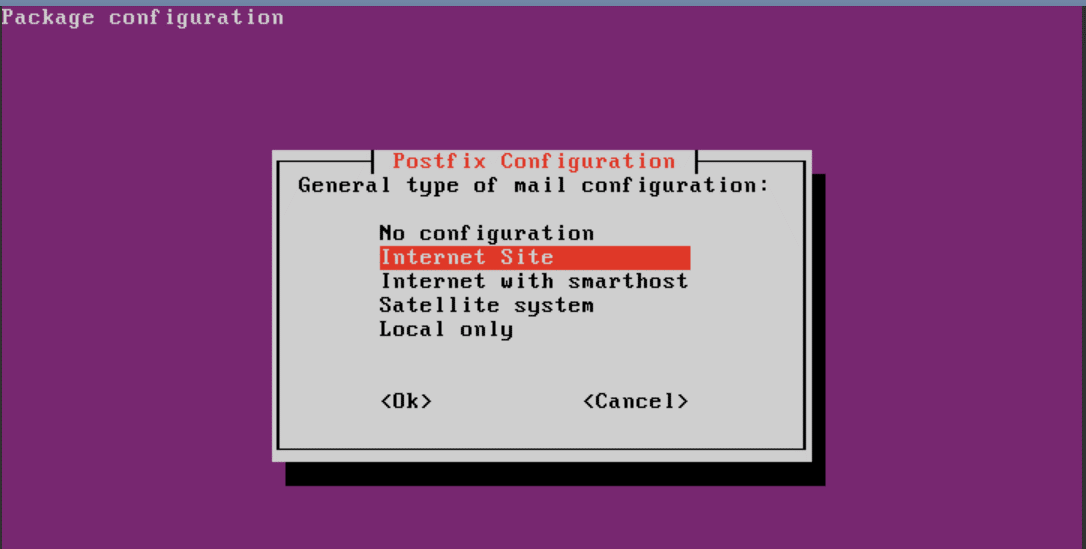
Durante a instalação selecione o Site da Internet como tipo de configuração de e-mail.
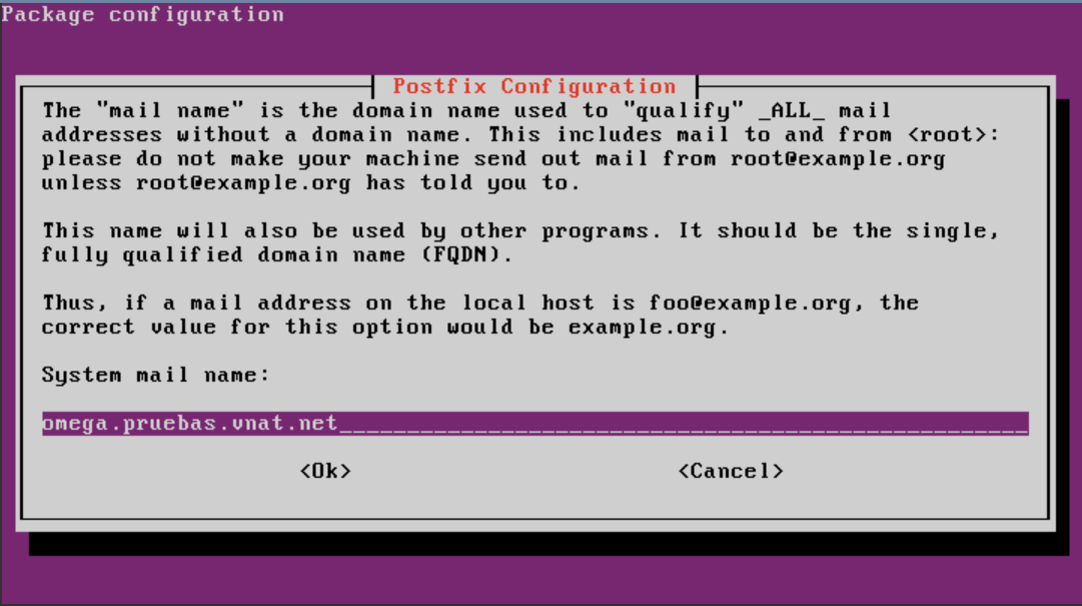
Entre com o nome o servidor de e-mail:
Configure o Postfix para usar o SMTP-AUTH do Dovecot, adicionando as seguintes linhas no arquivo /etc/postfix/main.cf.
home_mailbox = Maildir/Find the line myhostname anb configure the server's name by replacing "localhost' with the VM's FQDN which has the form:
smtpd_sasl_type = dovecot
smtpd_sasl_path = private/auth
smtpd_sasl_local_domain =
smtpd_sasl_security_options = noanonymous
broken_sasl_auth_clients = yes
smtpd_sasl_auth_enable = yes
smtpd_recipient_restrictions = permit_sasl_authenticated,permit_mynetworks,reject_unauth_destination
smtp_tls_security_level = may
smtpd_tls_security_level = may
smtp_tls_note_starttls_offer = yes
smtpd_tls_loglevel = 1
smtpd_tls_received_header = yes
<virtual_machine>.<customer_name>.vnat.net
Por examplo:
myhostname = virtualmail.mycompany.vnat.net
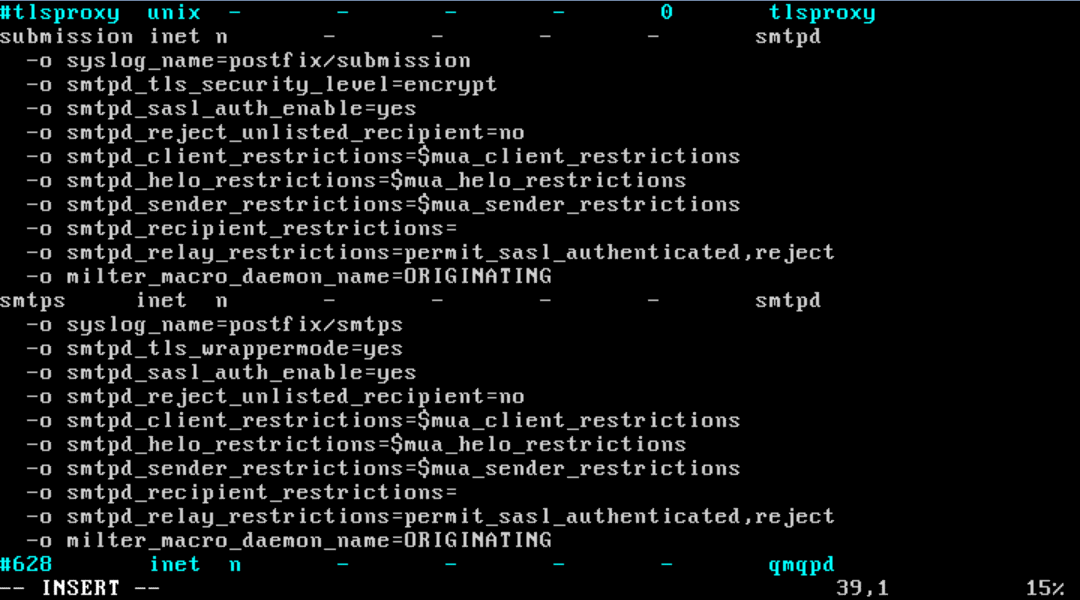
Abra o arquivo /etc/postfix/master.cf e descomente as linhas para permitir SMTPS e SUBMISSION
Agora, instale o Dovecot SASL com o comando:
#apt-get install dovecot-common
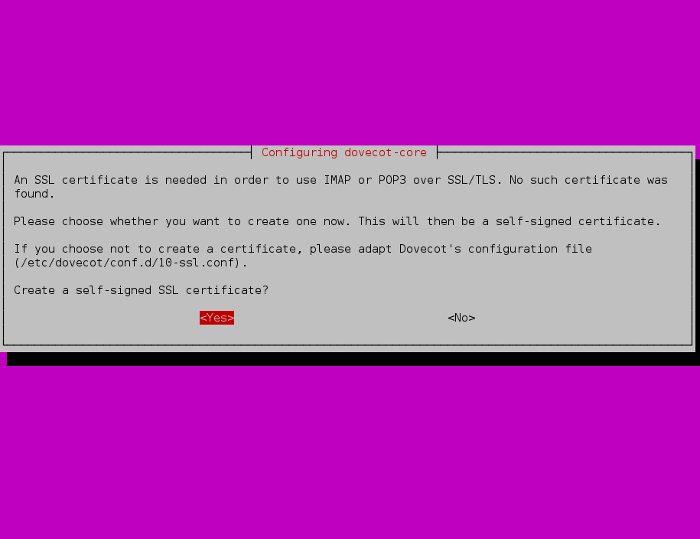
Responda SIM, e digite o nome do servidor de e-mail.
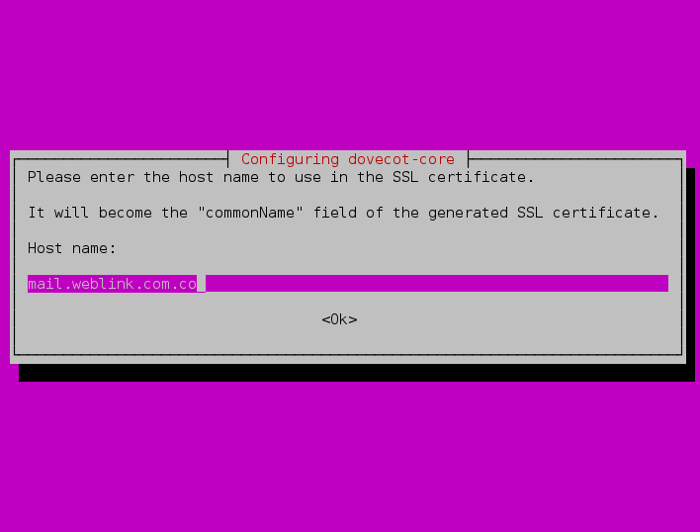
Agora, edite o arquivo /etc/dovecot/conf.d/10-master.conf e procure pela linha abaixo
# Postfix smtp-auth(Normalmente próximo da linha 95 do arquivo) e adicione o seguinte:
# Postfix smtp-authDeve-se parecer como:
unix_listener /var/spool/postfix/private/auth {
mode = 0660
user = postfix
group = postfix
}
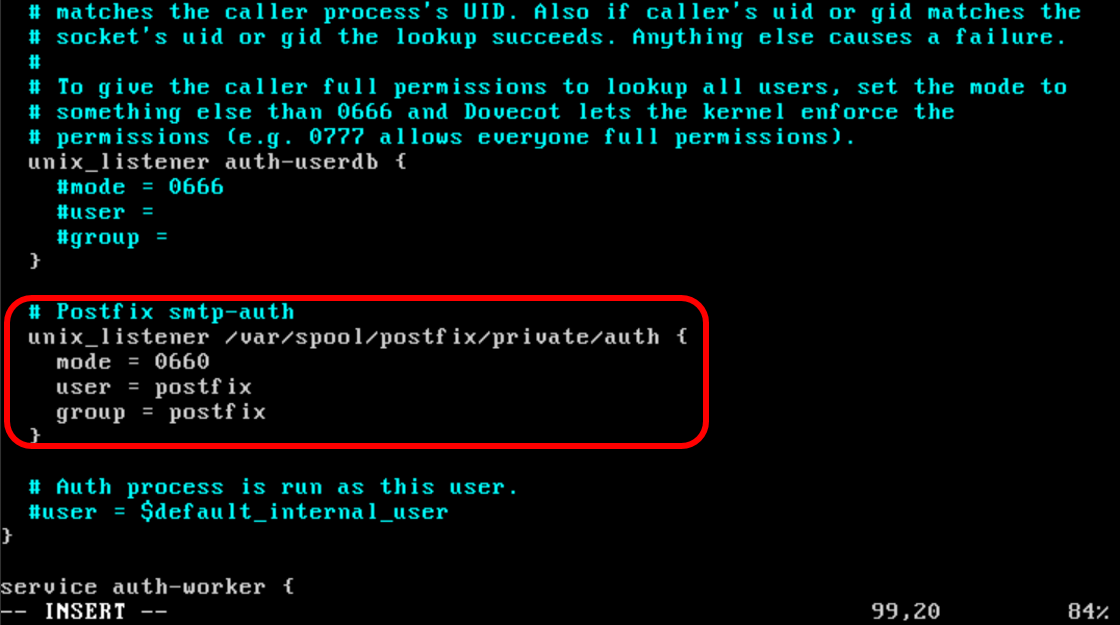
Abra o arquivo /etc/dovecot/conf.d/10-auth.conf e habilite a autenticação simples:
disable_plaintext_auth = noNão se preocupe, o Cloud-Bricks irá criptografar as senhas para você se você escolher o POP3s ou
Protocolos seguros do IMAP4s.
Na mesma linha, procure a linha:
auth_mechanisms
(Geralmente perto da linha 100) e altere-o para:
auth_mechanisms = plain login
Reinicie o postfix e o dovecot.
# service postfix restartExperimente o Telnet para verificar a resposta do SMTP.
# service dovecot restart

Install IMAP and POP3 support.
#apt-get install dovecot-imapd dovecot-pop3dEdit the file /etc/dovecot/conf.d/10-mail.conf and find the line:
mail_location
Modify the line so it looks like this:
mail_location = maildir:~/Maildir
Now edit POP3 settings in the /etc/dovecot/conf.d/20-pop3.conf file. Locate and uncomment the following line:
pop3_uidl_format = %08Xu%08Xv
Restart Dovecot.
service dovecot restartRun telnet command one more time.

Create an email account:
# useradd -m bobby -s /sbin/nologin
# passwd bobby
The basic configuration is ready. Now you may create user accounts and configure your email server. Please refer to PostFix and Dovecot documentation for detailed information.
Mail server On Windows
A Windows server normally uses Microsoft Exchange as email service. Therefore you must have a virtual machine already installed with the Windows Operating system.Windows CORE would suffice. The server must be part of a domain.
Install prerequisite software:
C:\> Install-WindowsFeature AS-HTTP-Activation, Desktop-Experience,Install Exchange Server 2016 Edge Transport server:
NET-Framework-45-Features, RPC-over-HTTP-proxy, RSAT-Clustering,
RSAT-Clustering-CmdInterface, RSAT-Clustering-Mgmt,
RSAT-Clustering-PowerShell, Web-Mgmt-Console, WAS-Process-Model,
Web-Asp-Net45, Web-Basic-Auth, Web-Client-Auth, Web-Digest-Auth,
Web-Dir-Browsing, Web-Dyn-Compression, Web-Http-Errors,
Web-Http-Logging, Web-Http-Redirect, Web-Http-Tracing, Web-ISAPI-Ext,
Web-ISAPI-Filter, Web-Lgcy-Mgmt-Console, Web-Metabase,
Web-Mgmt-Console, Web-Mgmt-Service, Web-Net-Ext45, Web-Request-Monitor,
Web-Server, Web-Stat-Compression, Web-Static-Content, Web-Windows-Auth,
Web-WMI, Windows-Identity-Foundation
C:\> Install-WindowsFeature ADLDSInstall Active Directory:
C:\> Install-WindowsFeature RSAT-ADDSCopy the Exchange installation files to a local directory.
From the console, enter the directory and run the installers.
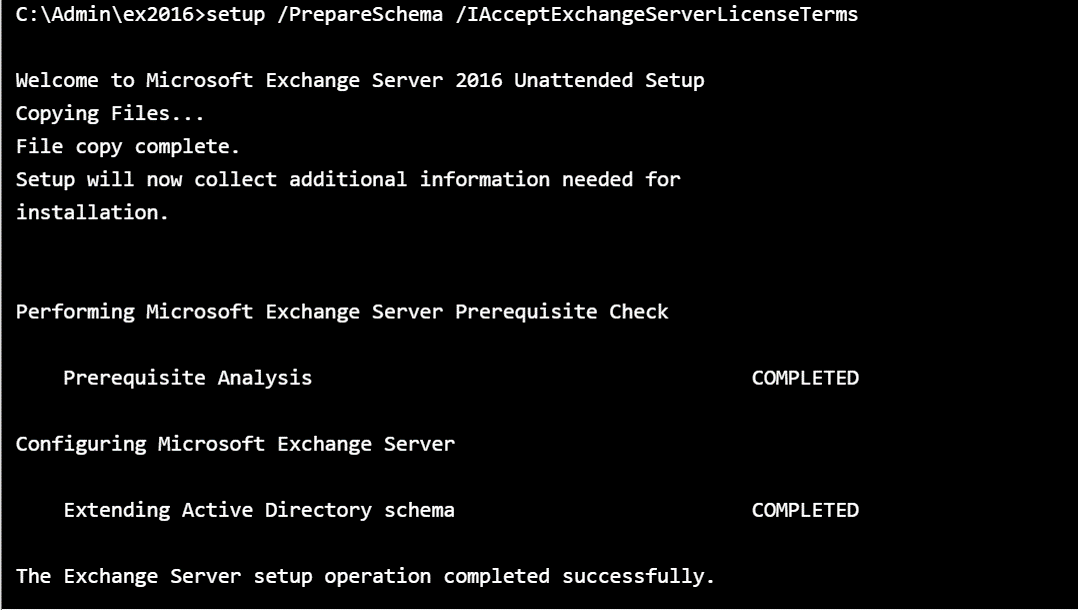
Inform the name of the organization to the Exchange server.
C:\Admin\ex2016>setup /PrepareAD /OrganizationName:"Organizarion Name" /IAcceptExchangeServerLicenseTermsThe installation process begins.
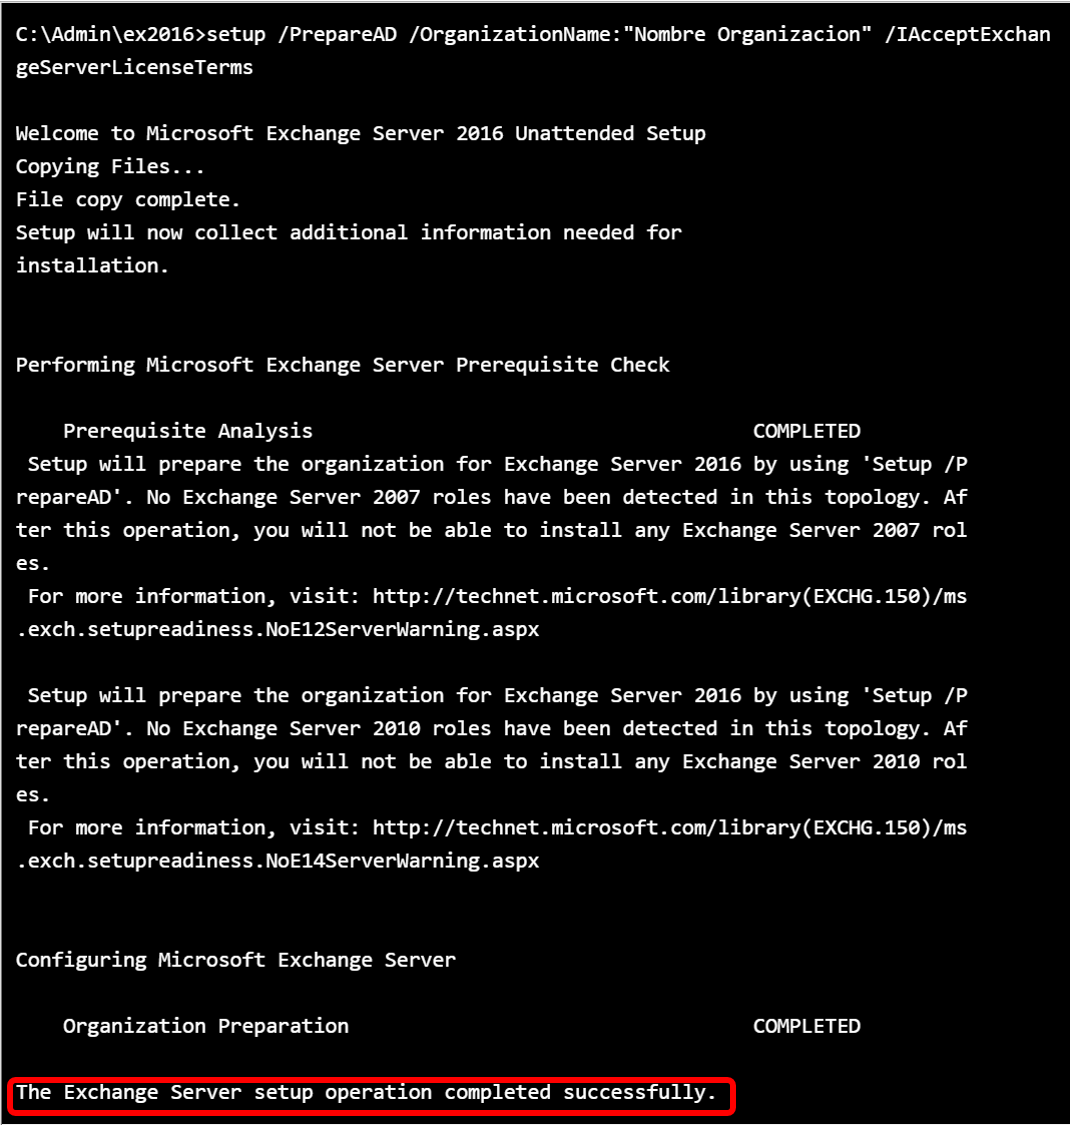
The role of MailBox server has all the necessary elements for exchange.
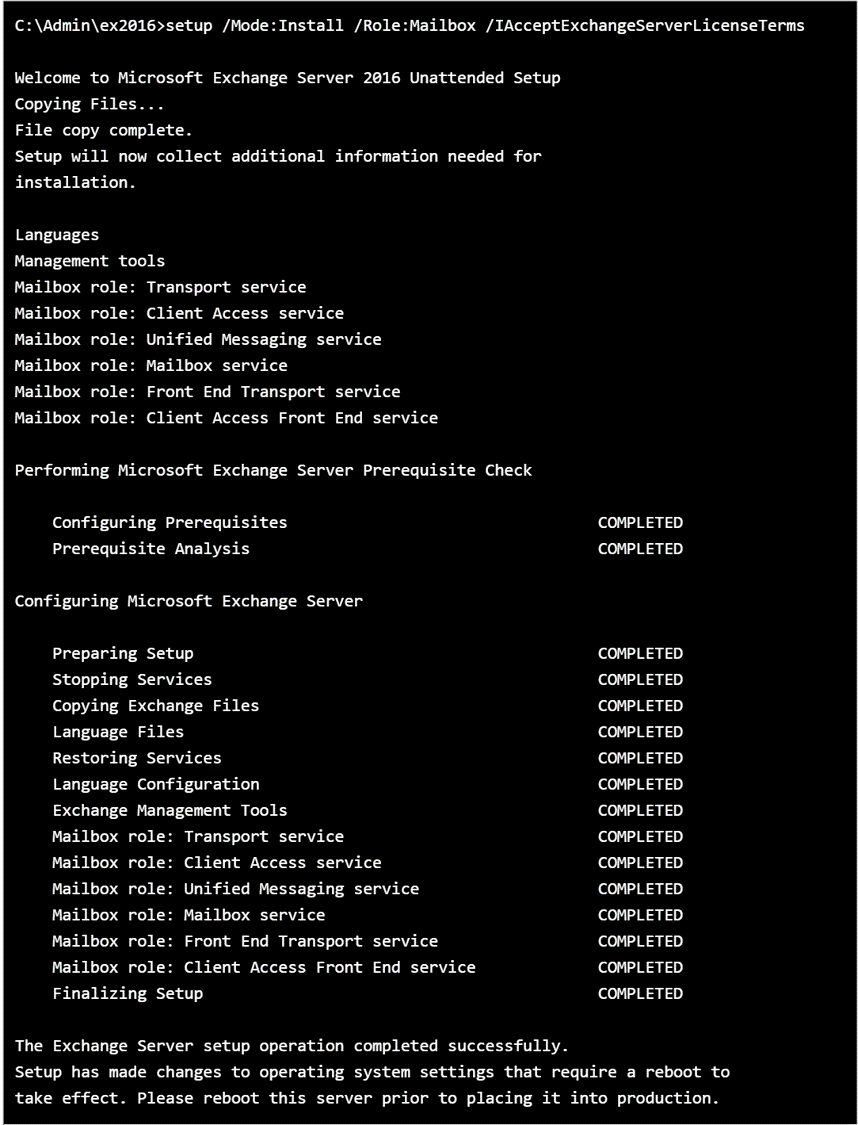
Now the server is ready for operation.
Managing SSL Certificates
When an email server is created it is necessary to use digital certificates to handle secure communication between clients and the server. This is required to activate the SMPTS, STARTLS, POP3S and IMAPS secure protocols. The details of how SSL certificates work are in the section of SSL Certificates.
We recommend to buy your SSL Certificates from a trusted Certification Authority, Self-Signed certificates are only useful for testing purposes and do not work with big email networks like Outlook.com or Gmail.
Go to Web System > SSL Certificates. Click on the Generate CSR... button and select the "eMail/POP3s/IMAPs Certificate" option.

The certification authority will request this CSR (Certificate Signing Request) in order to generate your SSL certificate.
When your receive the certificate file, you may use the SSL Certificates interface to upload it to the Cloud-Bricks system.
Email client setup
Outlook on Windows
Outlook is the preferred email client for Windows, it supports secure connections and is the natural client for MS exchange.
Your VM must be configured with plain POP3 Access and plain password authentication.
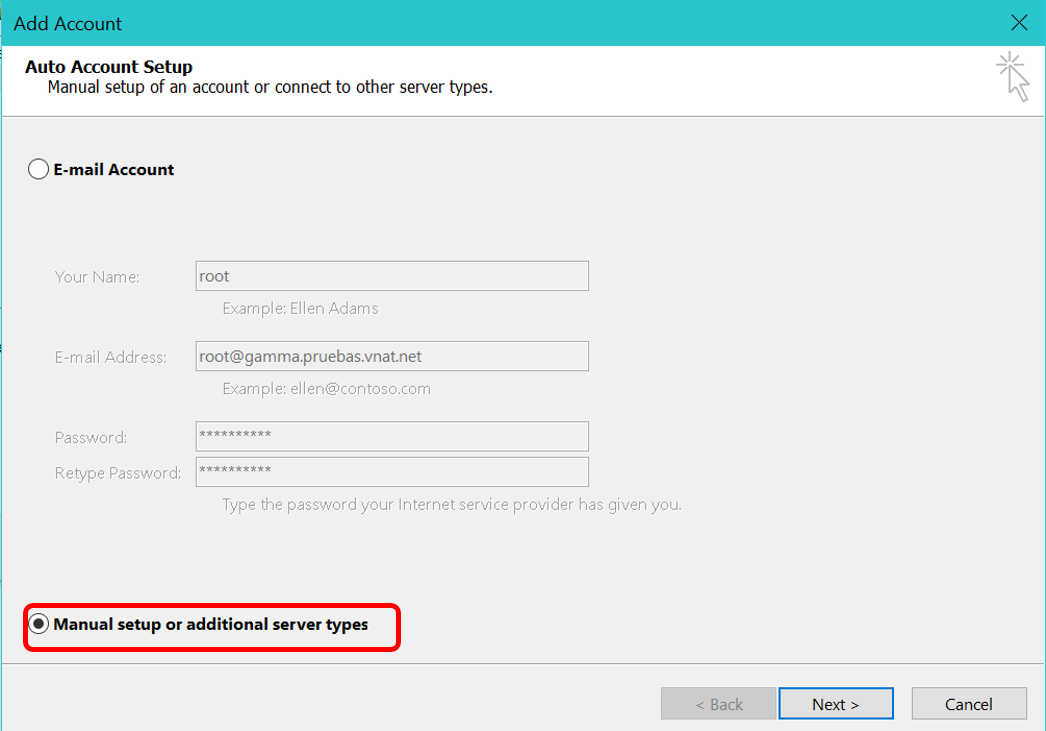
Open the wizard and select "Manual setup or additional server types"
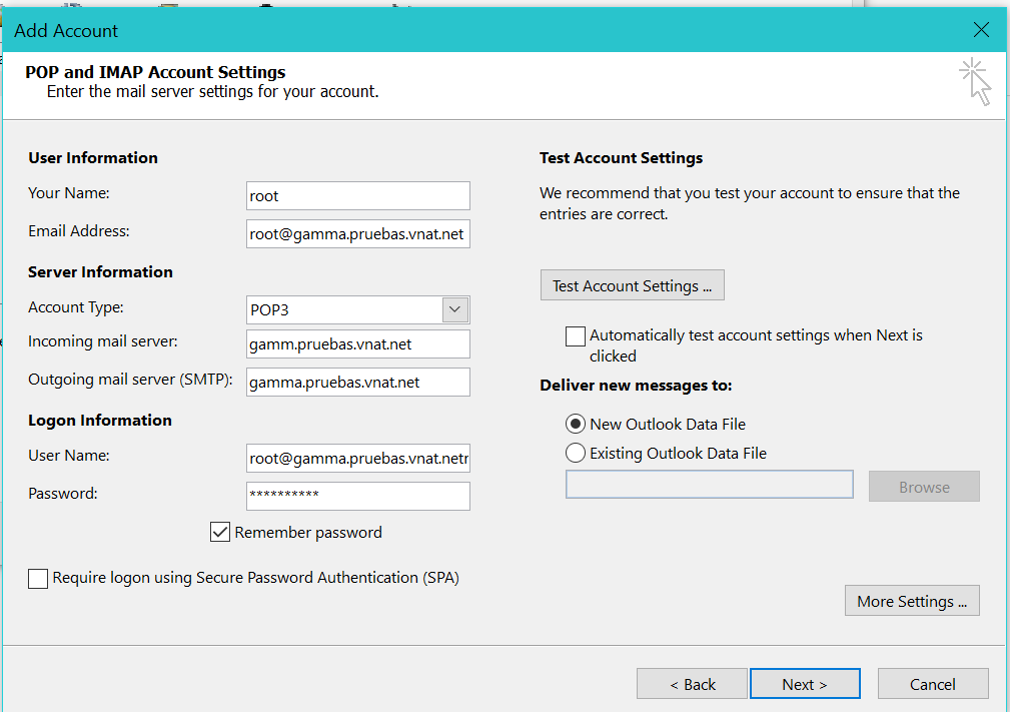
Put your information here, as below
Click in the More Settings buttons and select the SSL protocols.
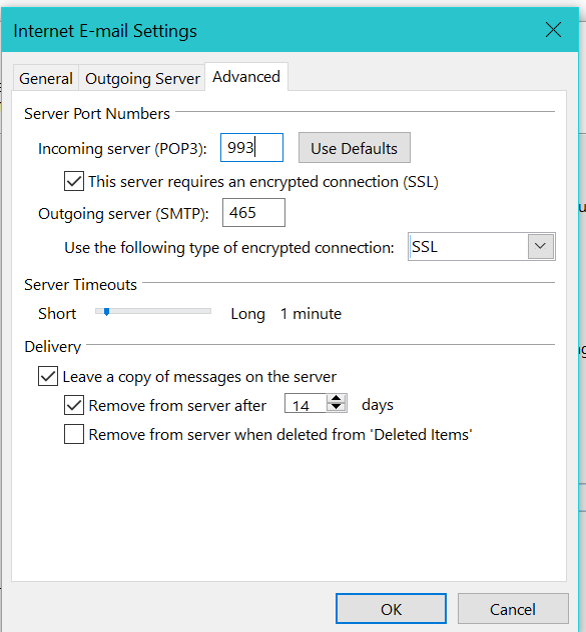
Click in OK. Then, your account will be added
Thunderbird on Linux
Thunderbird is a free, open source, cross-platform email client developed by the Mozilla Foundation.
Installing a certificate
If you are working with Self-Signed certificates then you must install the "SSL certification Authority" in Thunderbird.
Open Thunderbird, and click the Application menu button, choose Preferences.

Go to The "Advanced" option, choose the "Certificates" tab, click on View Certificates button:
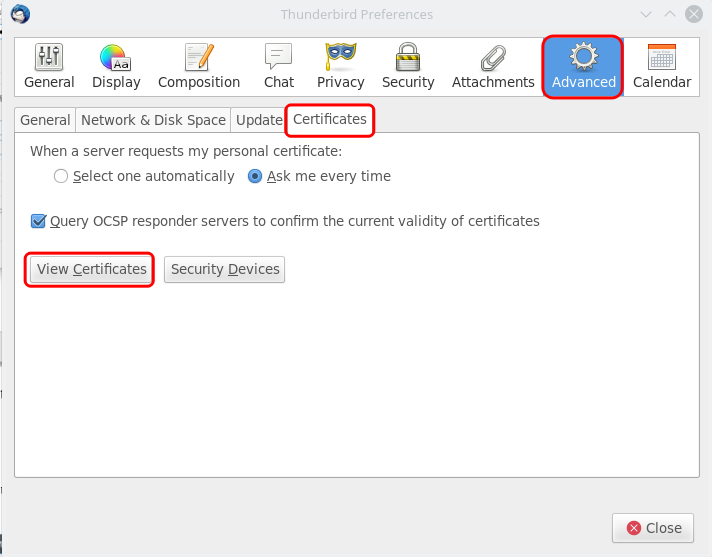
You have to download the <customer_name>MAILCA.crt certificate file, from the SSL Certificates page.
Open the tab "Authorities", click on Import and browse the previously downloaded certificate. When the certificate is loaded, choose the CA, and click on "Edit Trust...":
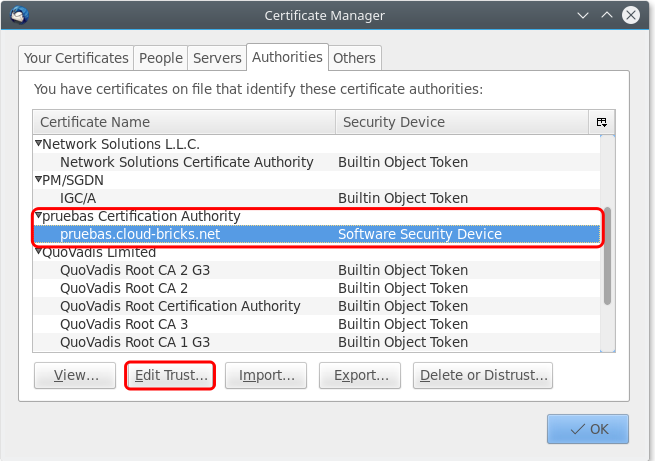
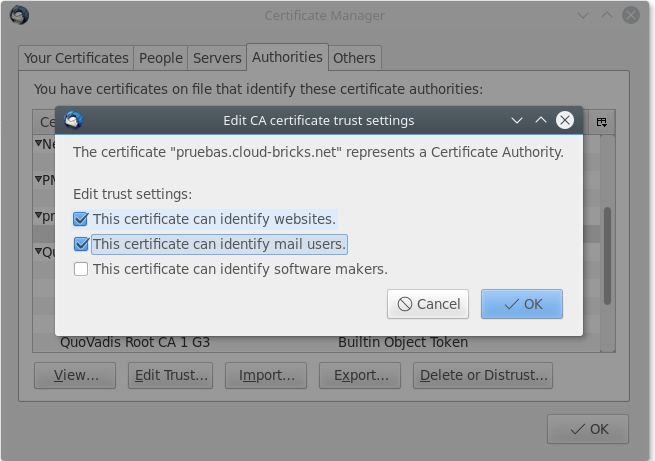
With every root-certificate you import, you'll be asked for what you'd like the certificate to be trusted.
Select both: "Trust this CA to identify email users" and "Trust this CA to identify websites"
Now, we can add our email account. In this example we are using the IMAP protocol for email reading.

- Your Name
- Your e-mail
- Your password
- Choose SSL/TLS
- Choose SSL/TLS
- Very important to select Normal password here
- You have to put your complete email here too.
Mail on MacOS
"Mail" is an email client included with the OS X series of operating systems, iOS and watchOS by Apple.
Installing Certification Authority
If you are working with Self-Signed certificates then you must install the SSL certificate in the operating system.
You have to download the <customer_name>MAILCA.crt certificate file, from the SSL Certificates page.
Now double-click the <customer_name>MAILCA.crt file and press the "Add" button.

Your admin credentials will be requested. The CA certificate will be installed.
Configuring an email account
Now open the mail App, and go to "Accounts". Click on "Add"

Fill the SMTP configuration data. In this example we are using IMAP as reading protocol.

Please be sure that you use the complete mail address as user name. Your email account now is ready to use.